Author Topic: BE 646  (Read 210428 times)

dkp_cobra

  • Hero Member
  • *****
  • Posts: 931
    • View Profile
Re: BE 646
« Reply #390 on: June 19, 2022, 12:27:56 »
It's a quite long time ago that I posted something. Everything started end of March. I wanted to install the fuel tank and checked the position of the exhaust pipes. Previously, I checked the fuel tank in conjunction with the exhaus pipes --- which leads to a tank modification --- and I installed the fuel tank and checked clearance to the nuts of the rear triangle control arms. Everything was fine. But during the installation of the fuel tank I had to recognise that the fuel tank must be installed first and after that the bolds of the rear triangle control arms must be installed. It doesn't work the other way round  :( .

Second I detected that the exhaust pipes do not hit the fuel tank but the fuel tank straps.

So, to make a long sad story short, I decided to build a new fuel tank with new fuel tank straps. How complicated can this be? I guessed it is a one or two week work  :o . Well, it was a little bit more complex ...
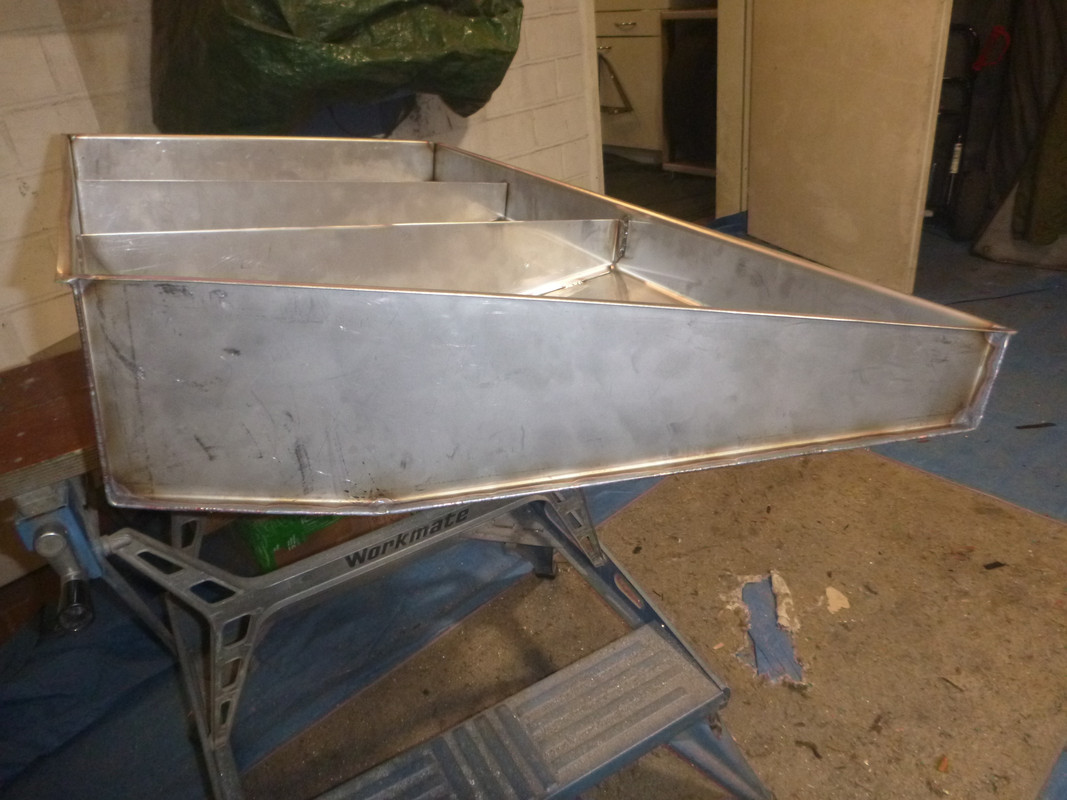
bending the lower part:

welding the studs to fix the fuel tank in the straps:


welding the baffle plates:

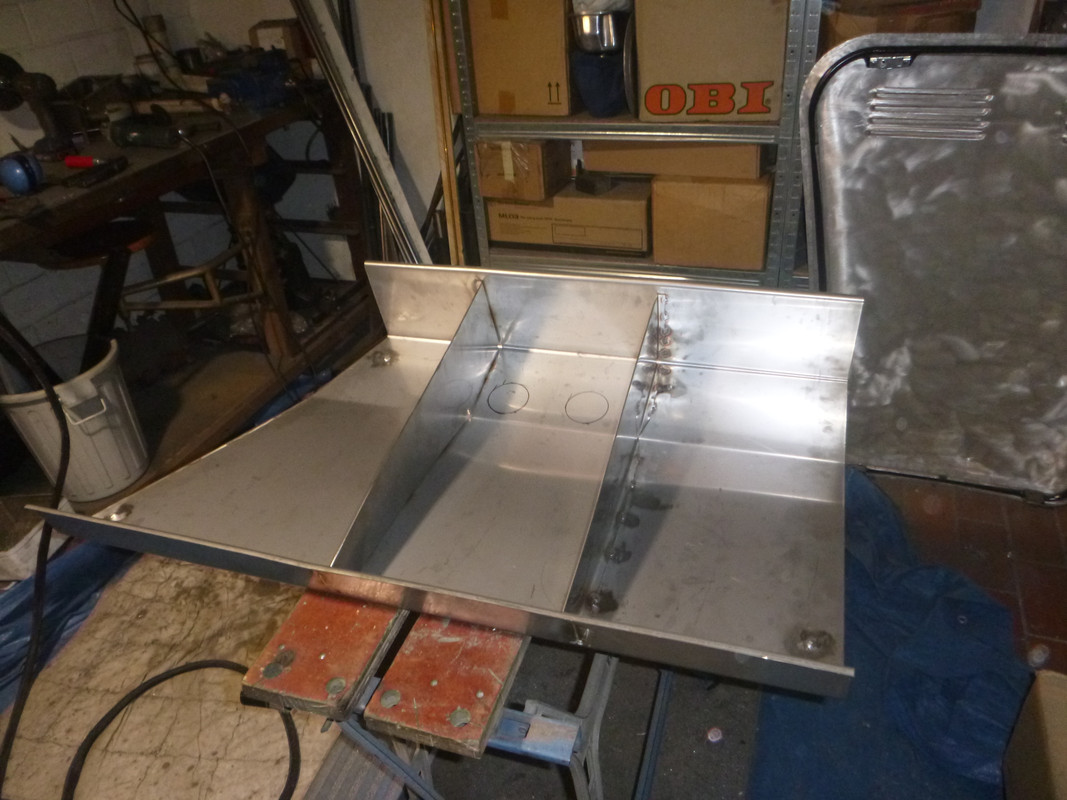
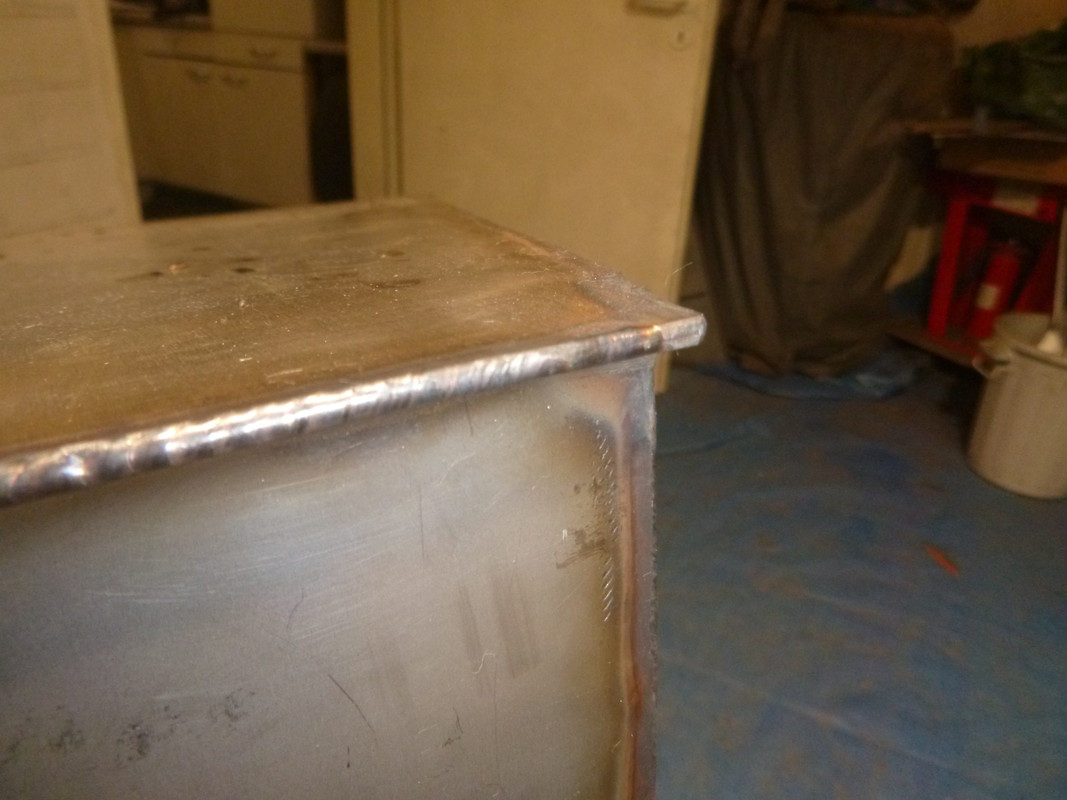
and the side plates. It is important to weld the abutting edges from inside before the sides plates are welded to the rear body:


preparing the feed pipe and the inlets for the fuel sender and the outtake:

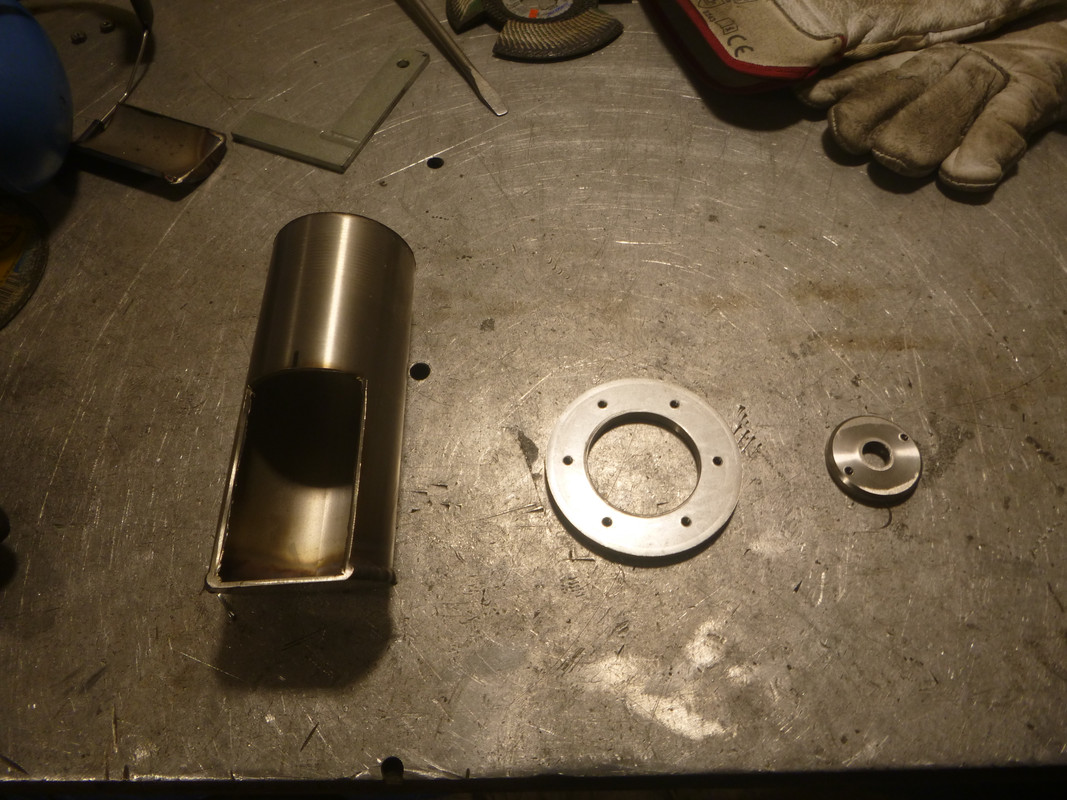
welding the feed pipe into the body:


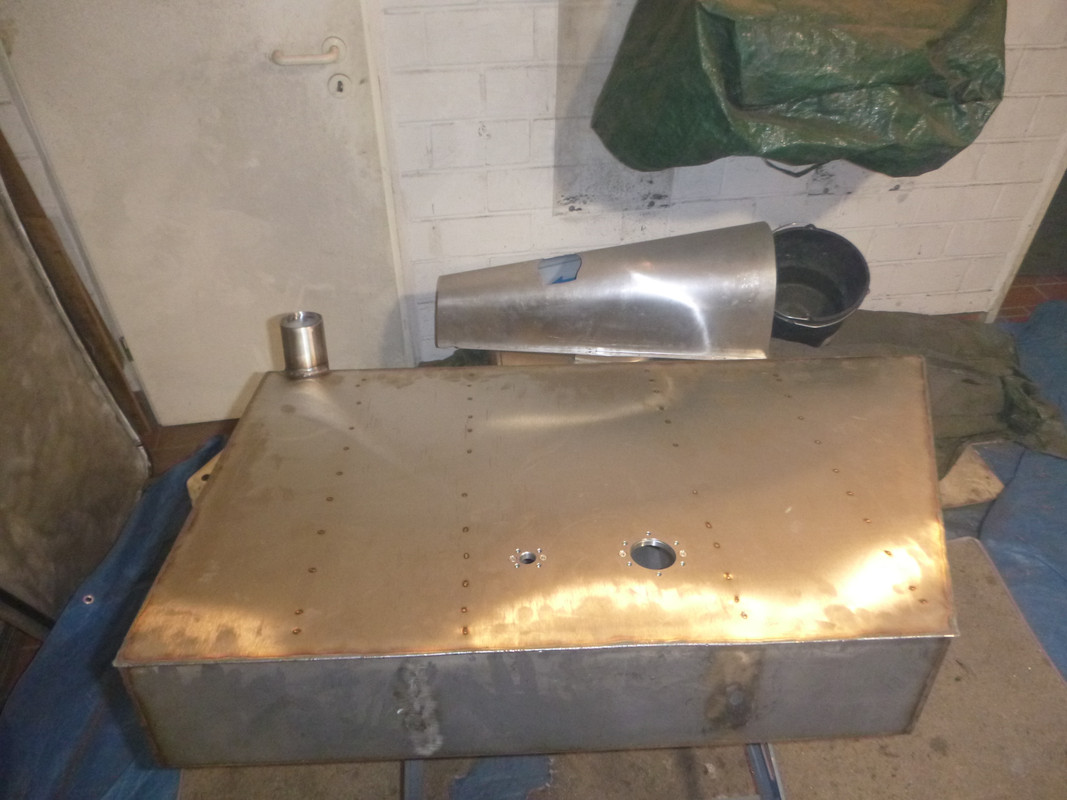
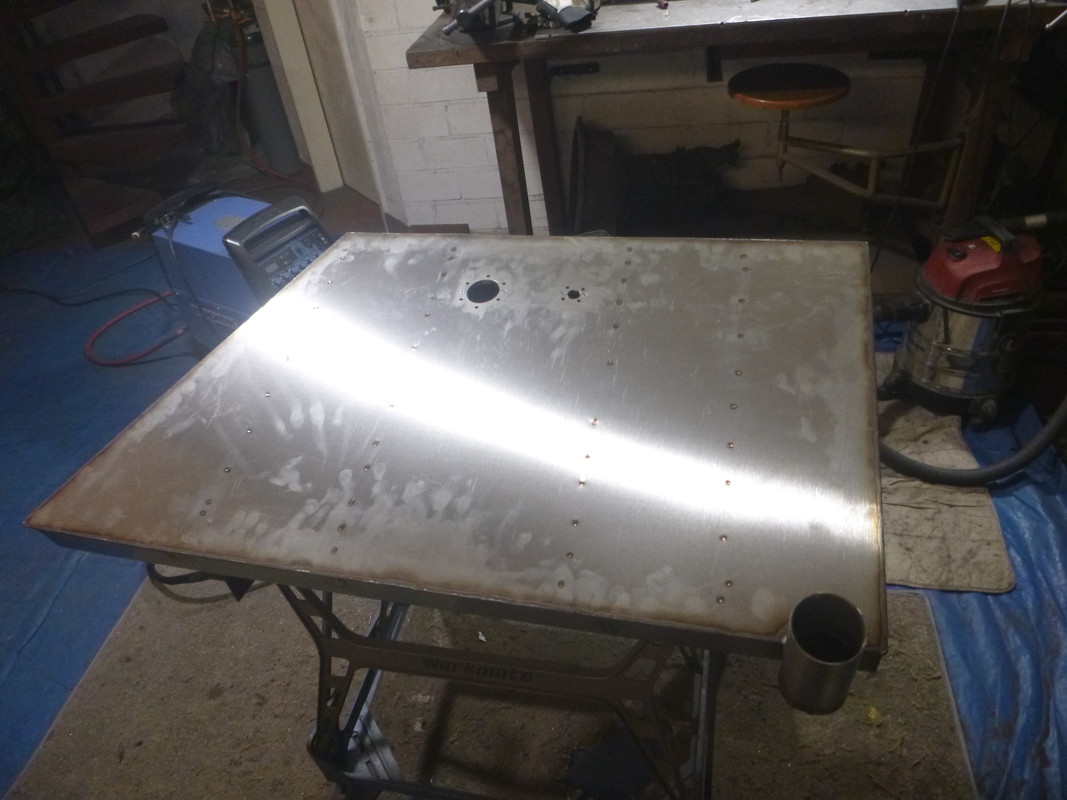
preparing the upper plate with enforce braces:

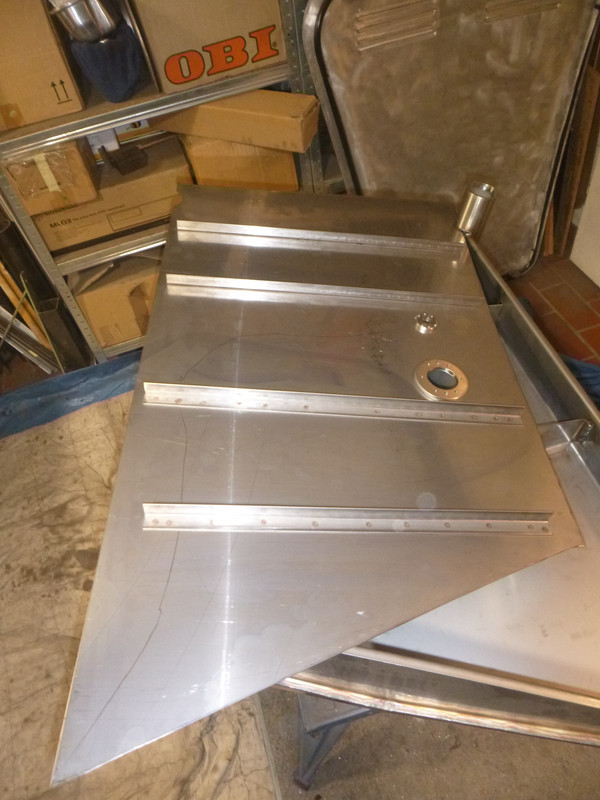
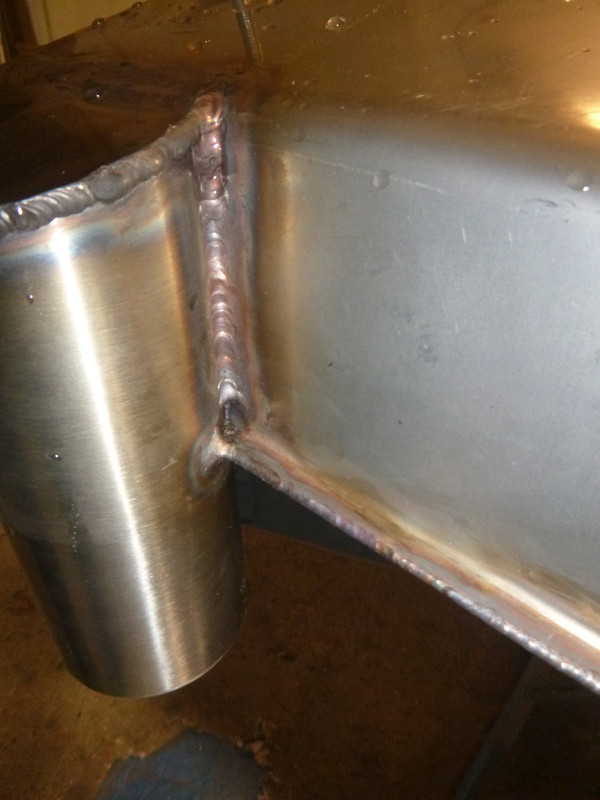
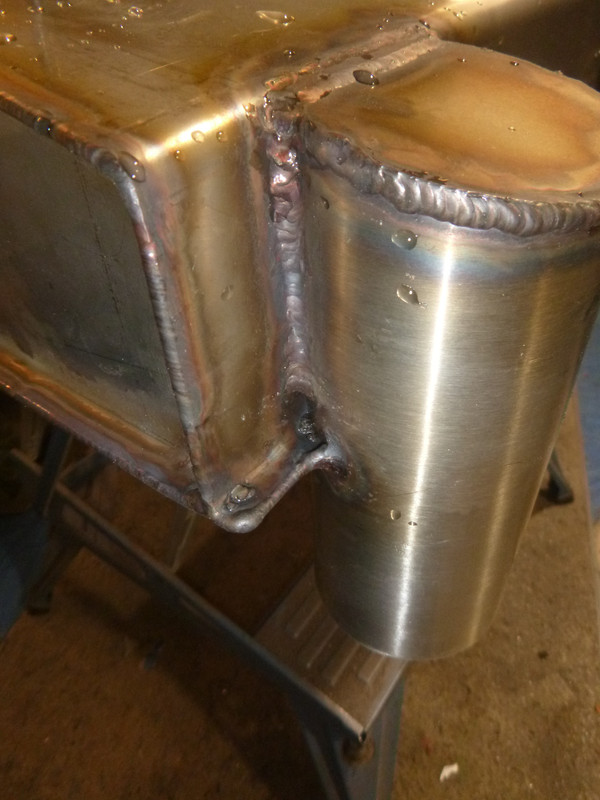
welding all together:


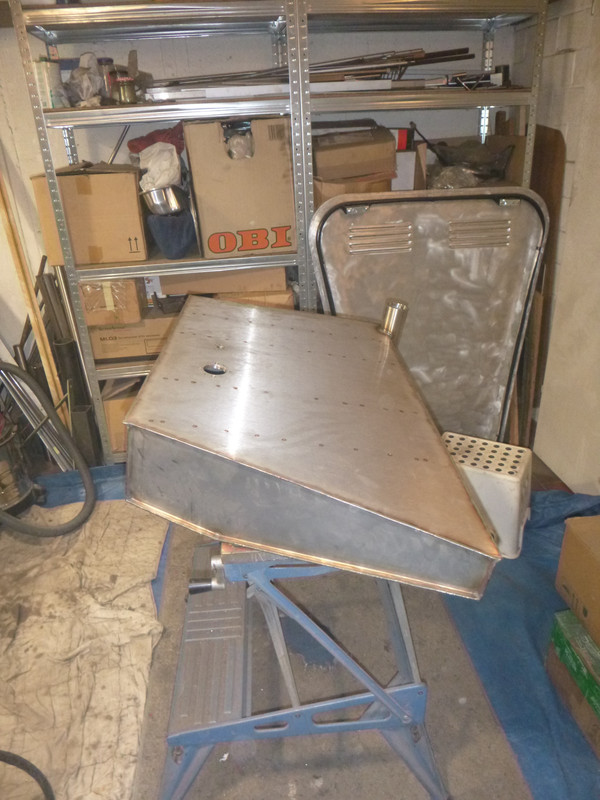
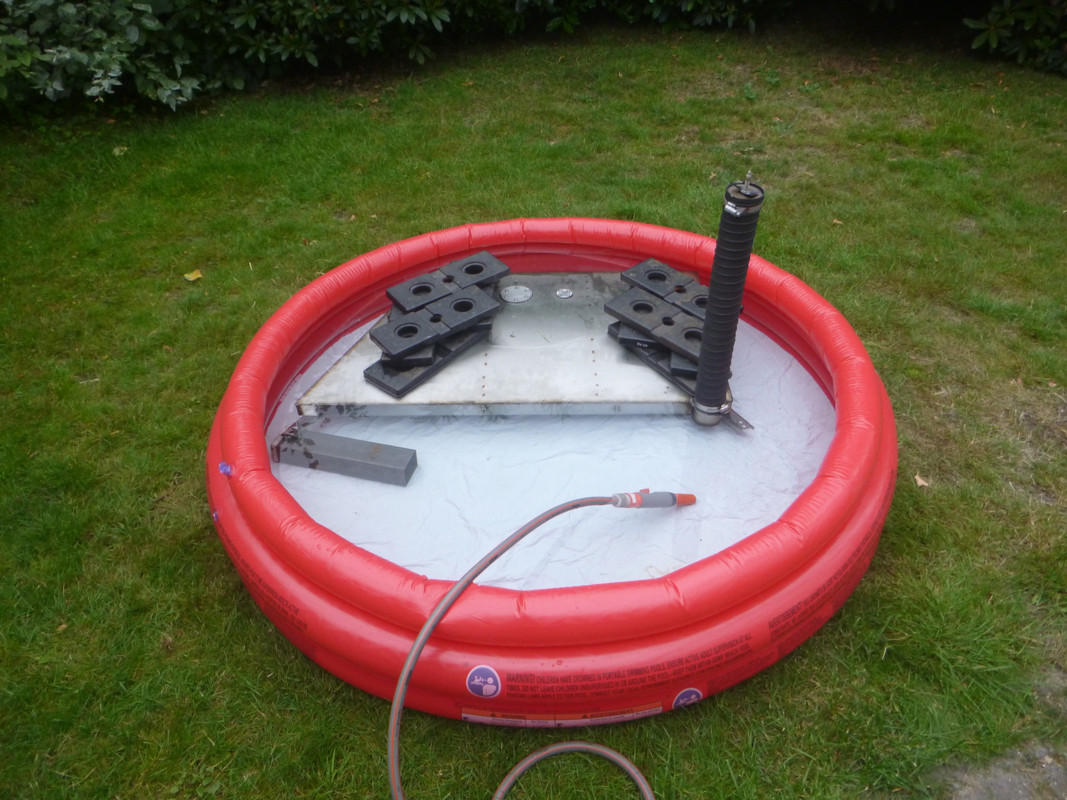
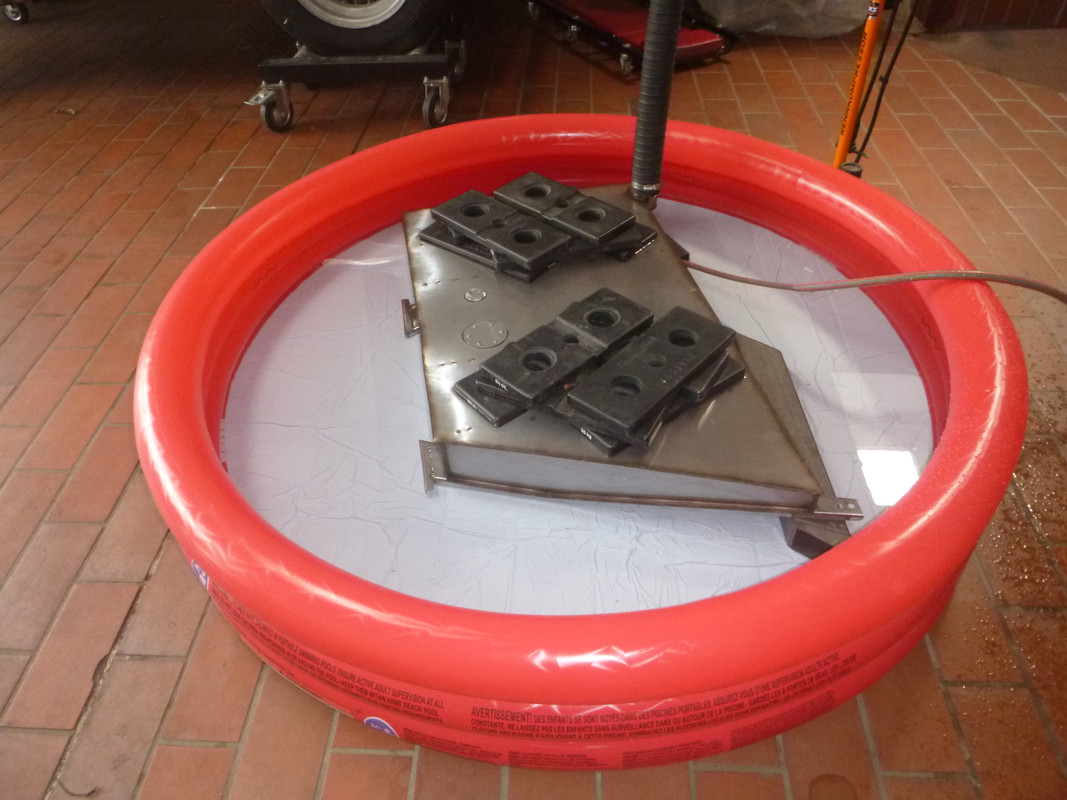
Now, the great pressure check:

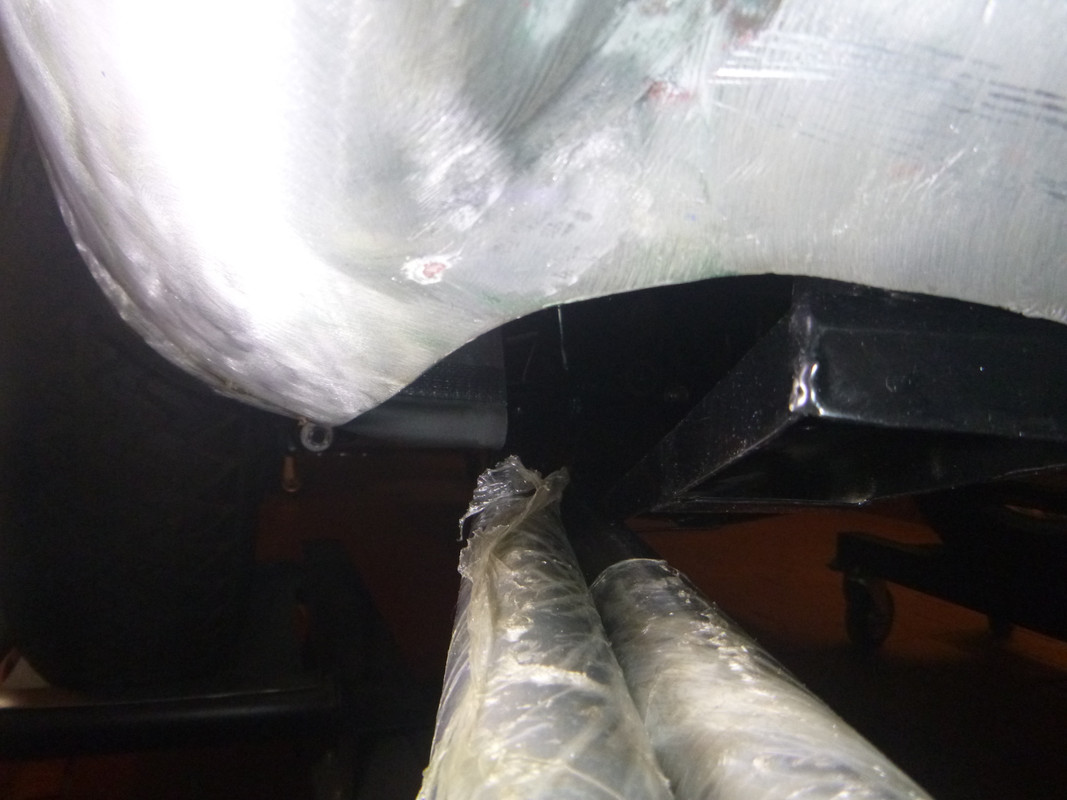
I forgot 5 millimeters between the body and the top plate:

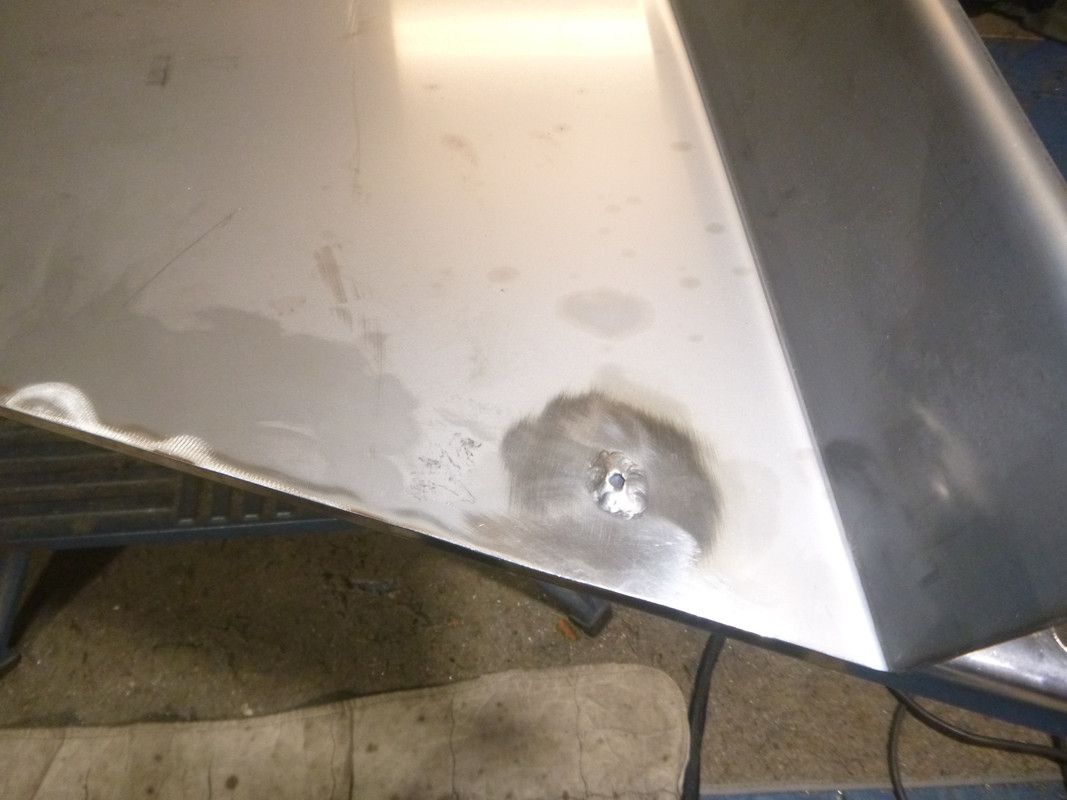
and as expected the feed pipe has not perfect although I tried to weld them from inside:


After fixing all these problems the fuel tank holds the pressure over the night and the final water test showed no bubbles.


dkp_cobra

  • Hero Member
  • *****
  • Posts: 931
    • View Profile
Re: BE 646
« Reply #391 on: July 02, 2022, 08:36:21 »
While looking at ebay.co.uk I found a seller from Canada who offers hand modified car model. Funny, he also has my car:
https://www.mimodels.com/catalog/1959-ac-aceca-bristol-monte-carlo-rally-108-p-1248.html?osCsid=612v8sjea9ikutrvpjsg83ma42


But I think 235 canadian dollars is not really a bargain for this kind of quality, is it.

dkp_cobra

  • Hero Member
  • *****
  • Posts: 931
    • View Profile
Re: BE 646
« Reply #392 on: July 20, 2022, 18:05:56 »
Last update before holidays.

The draft tube for the tank:


After a little hand-brushing the fuel tank is ready for installation. Some pictures showing the old and the new fuel tank:


and installed in the car:


Now, it's time for the fuel pipe:


Installation of the rear exhaust pipes. Now, they don't hit the fuel tank anymore.


The fuel pipe connecting the fuel filler cap with the fuel tank must be covered.


The old cover doesn't fit anymore. A new cover wasn't so easy to make since the form is quite organic. When you try to close a 3 mm gap at the top you get a new 7 mm gap at the right lower corner. Closing this makes things even more worse  :o


Before I fix it with some bolts I upholster the cover with leather because the thickness of the leather leads to different mounting points.


Good time to make also the cover for the opposite side.


And the best thing is that the spare wheel cover still fits. Well, after some modifications of one outline ...


At the end something complete different. I think I found an replacement for the PVC filler in the rain gutter. Right the original one and left my replacement. It's a little bit higher.


But I am satisfied with the look.


James Eastwood

  • Full Member
  • ***
  • Posts: 158
    • View Profile
Re: BE 646
« Reply #393 on: July 27, 2022, 10:12:18 »
Always a pleasure to see your updates. Your fuel tank build is very impressive. I had mended the leaks in my original tank and used an air mattress inflator, then sprayed on soapy water, but you're fully submerged technique is more thorough. Also interesting to note that Aceceas had a single fuel pick up where as Aces (certainly mine) have a pick up on each side, one for the mechanical pump and one for the extra electric pump.

James

dkp_cobra

  • Hero Member
  • *****
  • Posts: 931
    • View Profile
Re: BE 646
« Reply #394 on: July 27, 2022, 17:49:04 »
Always a pleasure to see your updates. Your fuel tank build is very impressive. I had mended the leaks in my original tank and used an air mattress inflator, then sprayed on soapy water, but you're fully submerged technique is more thorough. Also interesting to note that Aceceas had a single fuel pick up where as Aces (certainly mine) have a pick up on each side, one for the mechanical pump and one for the extra electric pump.

James
Now I know why the original fuel tank had two pick up. Well, I have a high volume fuel pump and I hope it will be enough.

dkp_cobra

  • Hero Member
  • *****
  • Posts: 931
    • View Profile
Re: BE 646
« Reply #395 on: July 27, 2022, 17:49:57 »
David updated the table of contents and the subject index. Thank you David.

James Eastwood

  • Full Member
  • ***
  • Posts: 158
    • View Profile
Re: BE 646
« Reply #396 on: July 28, 2022, 09:49:30 »
DPK - I've always assuemd the 2nd pump was more for scavenging whilst cornering that for increased flow, although it will enable both. When a second SU pump was fitted as an option it uses the 2nd tank pick up then route a separate pipe forward to a fuel filter (glass bowl type) on the inner LH wing, which is then T'd into the front of the Solex fuel rail. So the mechanical pump feeds the rear of the fuel rail and the electric SU feeds the front. The SU pump also allows you to prime the carbs prior to cranking the engine which is useful.

JE

James Eastwood

  • Full Member
  • ***
  • Posts: 158
    • View Profile
Re: BE 646
« Reply #397 on: July 28, 2022, 09:52:25 »
2nd fuel pipe routing into Solex fuel rail.

dkp_cobra

  • Hero Member
  • *****
  • Posts: 931
    • View Profile
Re: BE 646
« Reply #398 on: November 11, 2022, 17:11:58 »
After the summer holidays I wanted to install the engine. Hopefully for the last time. I was sure that the task would take more than 5 minutes but didn't expect bigger problems. Well ...
It was a quite tight job


Although I installed the engine several times at the end the fitting was not perfect. The rear mounting rubber holding the gear box was misaligned by approximately 3 mm.


So I made new engine mounts to allow the complete drive train shifting 3 mm to the front.


Nearly no difference between the old and the new part ...


... but with a much better alignment at the gear box mounting rubber


Also the bonnet fits perfectly


After that I wanted to install the inner front fender. I had to learn that it is not the best idea to make the inner panels before the car goes to the body shop. Next time I will do this after the job at the body shop is finished to save some time. To make a long sad story stort: I have new inner front fender this time they are two parted for easy installation.


Don't miss the rubber sheets. Not pop rivetted as original but screwed to make the parts removable.


« Last Edit: November 11, 2022, 17:18:57 by dkp_cobra »

dkp_cobra

  • Hero Member
  • *****
  • Posts: 931
    • View Profile
Re: BE 646
« Reply #399 on: November 25, 2022, 16:59:22 »
Now, the stone protection is installed inside in the front fenders


TTM

  • Full Member
  • ***
  • Posts: 184
    • View Profile
Re: BE 646
« Reply #400 on: November 26, 2022, 18:46:36 »
I cannot believe the amount of patience you have. It feels like this thread has been running for as long as I can remember... When are you hoping to get the car road-worthy?

dkp_cobra

  • Hero Member
  • *****
  • Posts: 931
    • View Profile
Re: BE 646
« Reply #401 on: December 02, 2022, 18:46:44 »
Thomas, indeed it is a quite long time ago that I started this project. My daughter was a little bit more than half a year old when the car arrived. My plan was to take the car for her first school day. Well, now she is in class seven (7!!!). My next (current) plan is to take the car to drive my daughter to her prom. So, six and a half year left. That's easy  :o
The project is much bigger than I ever expected and I must say it is a little bit too much for an "in the garage at you home" project. Nevertheless, I missed the point of no return many years ago and I learned so much I don't want to miss this experience.

dkp_cobra

  • Hero Member
  • *****
  • Posts: 931
    • View Profile
Re: BE 646
« Reply #402 on: December 02, 2022, 18:57:45 »
This position for the venting hose wasn't perfect. I was afraid that the hose would hit the front wheels.

The new design allows the hoses a higher position more away from the front wheels.


Makeing some clamps to the venting hoses


Now, the hoses are installed.


Enough space for the hoses not to get hit by the wheels.


dkp_cobra

  • Hero Member
  • *****
  • Posts: 931
    • View Profile
Re: BE 646
« Reply #403 on: December 10, 2022, 18:25:46 »
Installing some bits and pieces


The inside rearview mirror is a little bit strange. I think the construction is for a top mounting position and not for a bottom mounting on the dashboard as in the Aceca.


The lever of the Lucas dipping mirror is on the top and the Lucas lettering is upside down. But with another center stem it should be possible to turn the mirror.


Now, it should work.


SpqrEddie

  • Full Member
  • ***
  • Posts: 197
    • View Profile
Re: BE 646
« Reply #404 on: December 15, 2022, 15:30:58 »
At the end they were assembled with a lot of grease between them and wrapped with grease tape. Really a funny work. Everything stick to your hand after that work  :o


Hello!
wich kind of tape did you used? Petrolatum "Denso" tape?
Thanks!
« Last Edit: December 15, 2022, 15:33:13 by SpqrEddie »