Author Topic: BE 646  (Read 210120 times)

dkp_cobra

  • Hero Member
  • *****
  • Posts: 931
    • View Profile
Re: BE 646
« Reply #345 on: November 21, 2020, 18:10:40 »
As already suggested I think the hub had started to turn on the axle.


No way the remove the hub with a puller.

dkp_cobra

  • Hero Member
  • *****
  • Posts: 931
    • View Profile
Re: BE 646
« Reply #346 on: November 26, 2020, 14:38:59 »
Currently, I am working on the rear brakes. It was nearly impossible to use the brake adjuster


After cleaning and greasing with copper paste it works like a charm


What looks like a pizza tray will be the new drum brake dust cover. The old ones (in the middle) have reached the end of there lifetime.


James Eastwood

  • Full Member
  • ***
  • Posts: 158
    • View Profile
Re: BE 646
« Reply #347 on: December 02, 2020, 15:39:23 »
Bravo, keep going.

One of my rear hubs had the same problem as yours, despite using a puller and a hydraulic press eventually I had to cut them apart and replace the parts which were very difficult to find.

dkp_cobra

  • Hero Member
  • *****
  • Posts: 931
    • View Profile
Re: BE 646
« Reply #348 on: December 08, 2020, 15:24:18 »
The revenge of the mummy:


Fresh from the painter:


« Last Edit: December 08, 2020, 18:09:19 by dkp_cobra »

dkp_cobra

  • Hero Member
  • *****
  • Posts: 931
    • View Profile
Re: BE 646
« Reply #349 on: December 11, 2020, 16:51:12 »
The hand brake cables are dead

 
especially the clamps

I got new hand brake cables from Brian Eacott

tried to make new clamps on the lathe

and it seems to work  :)


dkp_cobra

  • Hero Member
  • *****
  • Posts: 931
    • View Profile
Re: BE 646
« Reply #350 on: December 17, 2020, 15:48:01 »
Work for the dumb: making header gaskets by drilling several small and big holes.


dkp_cobra

  • Hero Member
  • *****
  • Posts: 931
    • View Profile
Re: BE 646
« Reply #351 on: December 18, 2020, 18:27:35 »
A look inside of the hand brake mechanism part of the slave cylinder.


The black parts are not rusty but black zinc-plated.

AC Ace Bristol

  • Hero Member
  • *****
  • Posts: 1510
    • View Profile
Re: BE 646
« Reply #352 on: December 19, 2020, 09:33:17 »
.
Peter
Great Thread been following from day ONE.
As you have the rear  wheel brake cylinders apart......  Tim Isles had some internal parts  made e.g.  the two small rollers and the two taper sliders which give you adjustment.
Not sure if you need replacement parts,  as these items are not readily available.  Tim had additional ones made . ;)
Tim Isles Ace Bristol Registrar ... email:    tim_isles@hotmail.com
 Keith


dkp_cobra

  • Hero Member
  • *****
  • Posts: 931
    • View Profile
Re: BE 646
« Reply #353 on: December 20, 2020, 08:11:04 »
Keith,
thank you for the advice. My parts are still ok. I will use them and in conjunction with the copper paste it works quite well.
Kind regards,
Peter

dkp_cobra

  • Hero Member
  • *****
  • Posts: 931
    • View Profile
Re: BE 646
« Reply #354 on: December 23, 2020, 16:54:08 »
The orginal wheel nuts. 60 years of violance and abuse has left there marks.


Although I bought repro wheel nuts from MWS I decided to re-chrom the original wheel nuts. In agreement with the chroming-plating guy we decided not to remove every dent since the risk was revalant that the lettering would have been damaged. I think at the end I have some nice wheel nuts with some kind of patina. Also, the headlamp collars were re-chromed.


What a nice glittering christmas present  :)

dkp_cobra

  • Hero Member
  • *****
  • Posts: 931
    • View Profile
Re: BE 646
« Reply #355 on: December 31, 2020, 14:48:33 »
Last action for this year: assembling the rear hubs with new bearings and sealings


The perfect time to replace the old bolts. Unfortunately, I wasn't able to find part threaded bolts with a length of 1 1/4" with a non-thread length of 1/2". So I bought 1 3/4" bolts, cut every one repaired the first two thread pitch of every bolt. What a funny work.


The break shoes got new brake linings. If you do this at home be aware that the two pots of the adjusting mechanism have a left and a right side. If you mix them up the brake shoes have a bigger diameter and the brake drum doesn't fit anymore.


I used the axle from Triple M. As mentioned above they changed their design a little bit. The main nut isn't self locking anymore but should be fixed with blue Loctite.


And finished. I hope that I will install them into the car next year. The special washer of the break drums are not rusty but black zinc-plated. Maybe not the best idea ...


AE 501

  • Newbie
  • *
  • Posts: 33
    • View Profile
Re: BE 646
« Reply #356 on: January 11, 2021, 11:25:04 »
.....wie unsportlich, einfach den Entlüfternippel zu verlängern!

.....it's not fair but clever to have the bleeding nipple elongated!      My hands are not able to reach them in original shape ;-))

dkp_cobra

  • Hero Member
  • *****
  • Posts: 931
    • View Profile
Re: BE 646
« Reply #357 on: January 11, 2021, 11:36:17 »
.....wie unsportlich, einfach den Entlüfternippel zu verlängern!

.....it's not fair but clever to have the bleeding nipple elongated!      My hands are not able to reach them in original shape ;-))
Honour, to whom honour is due. I thought this design is original. The car had the elongated bleeding nipples when I bought it.

dkp_cobra

  • Hero Member
  • *****
  • Posts: 931
    • View Profile
Re: BE 646
« Reply #358 on: January 25, 2021, 14:21:57 »
I ordered some BSF bolts in UK middle of December. It took 4 weeks for them to arrive but now I was able to finish the front axle. Of course new bearings and sealings. The disc rotors have a thickness of 12mm so half of their lifetime has been reached. Should be good for some 1000 km "normal" driving.

The front brake calipers has been sand blasted and I painted them with a special 2-component brake paint. The pots looked like new but the sealings and dust covers had to be replaced. The anti-rattle plates were complete rotten. After making new from stainless steel I had to recognize that I can buy new one  >:( .


Due to missing tasks I started with some work on the dashboard. It is unbelievable how mush time you can spend on making a glovebox cover.


« Last Edit: January 25, 2021, 14:27:10 by dkp_cobra »

dkp_cobra

  • Hero Member
  • *****
  • Posts: 931
    • View Profile
Re: BE 646
« Reply #359 on: February 01, 2021, 17:04:48 »
After 3.5 month in the body shop and spending a fortune the car is back at home.


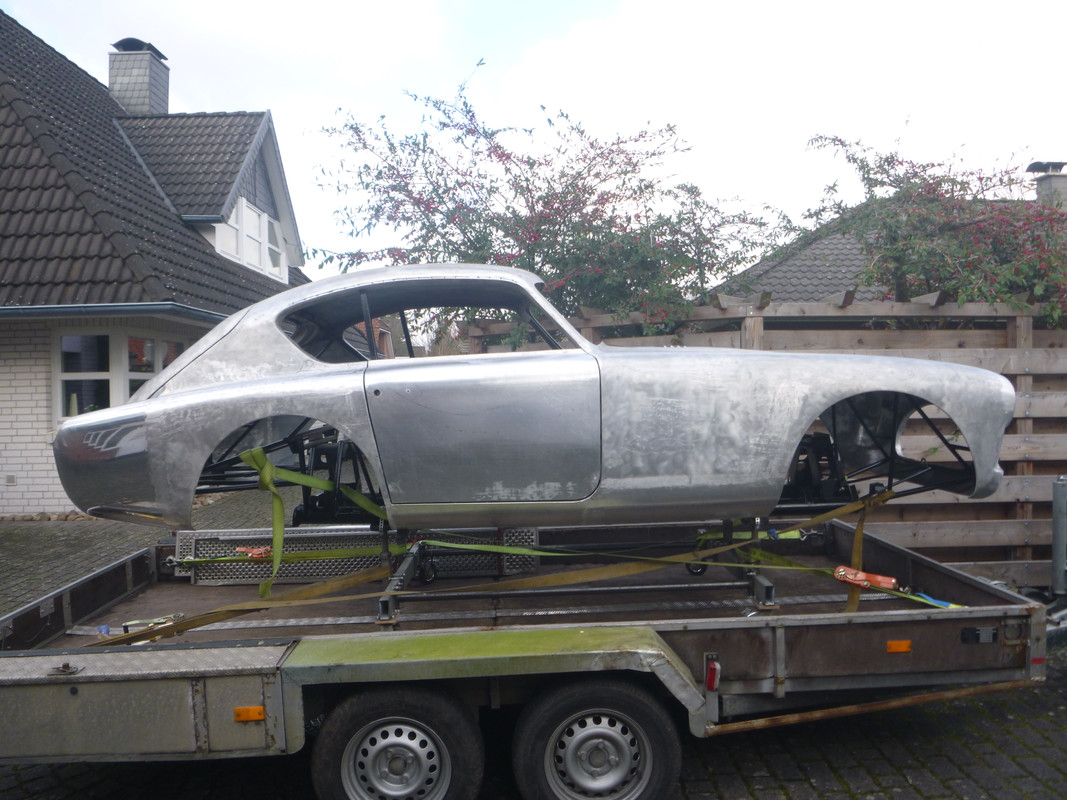
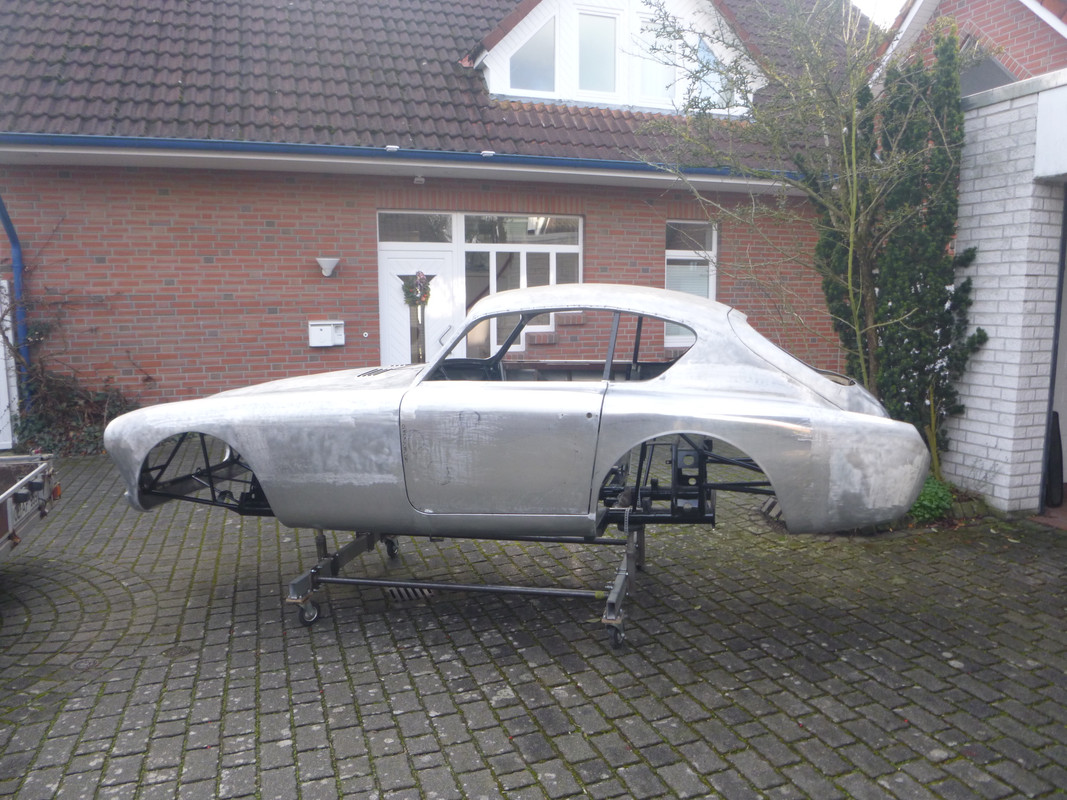
Except the roof every panel (really every) was repaired, modified and/or replaced. The door skins were a horror story of it's own.
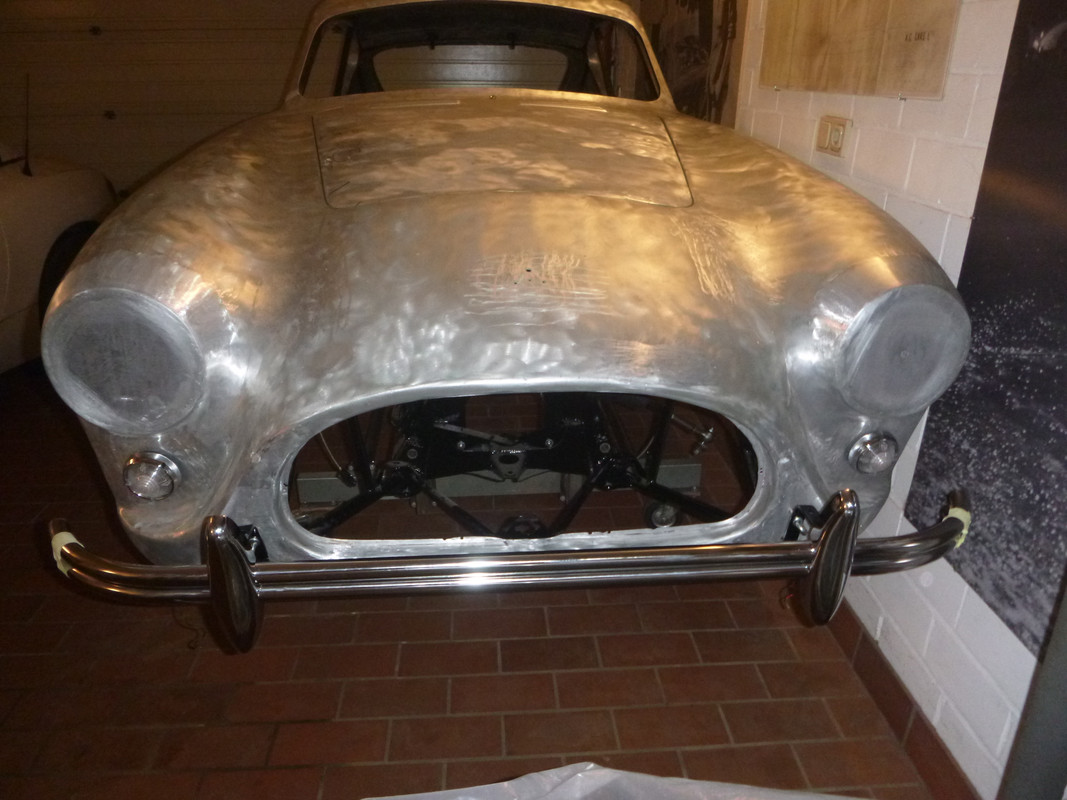
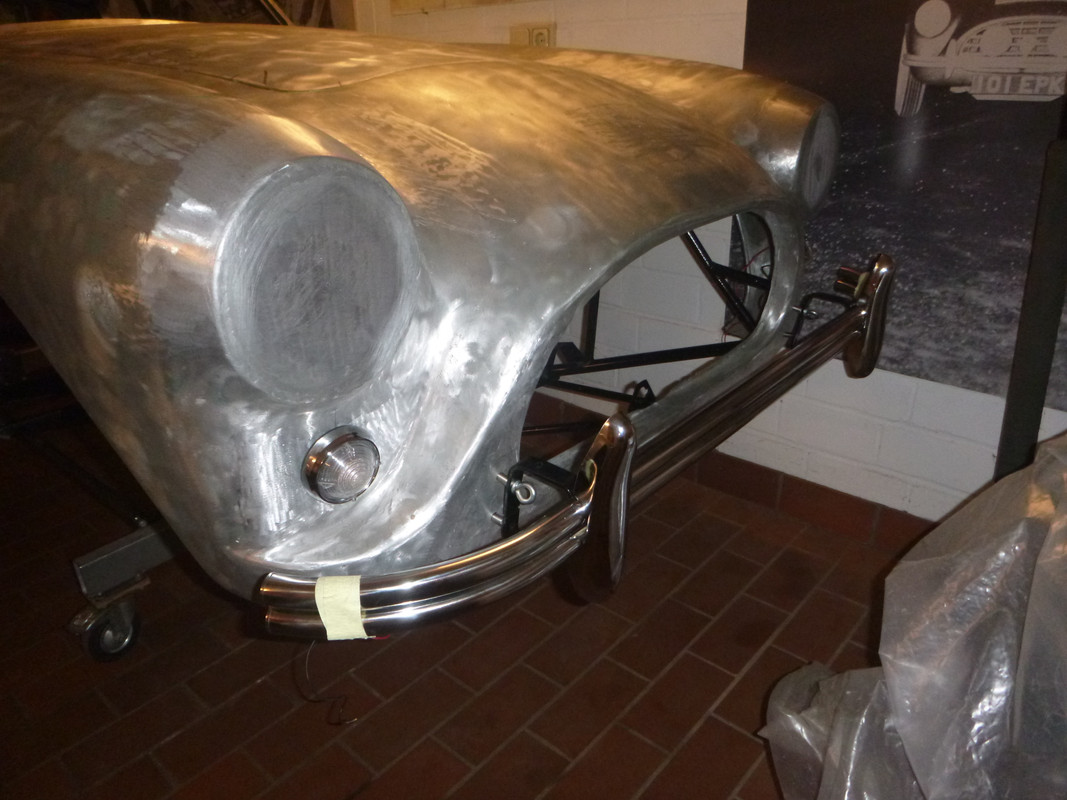
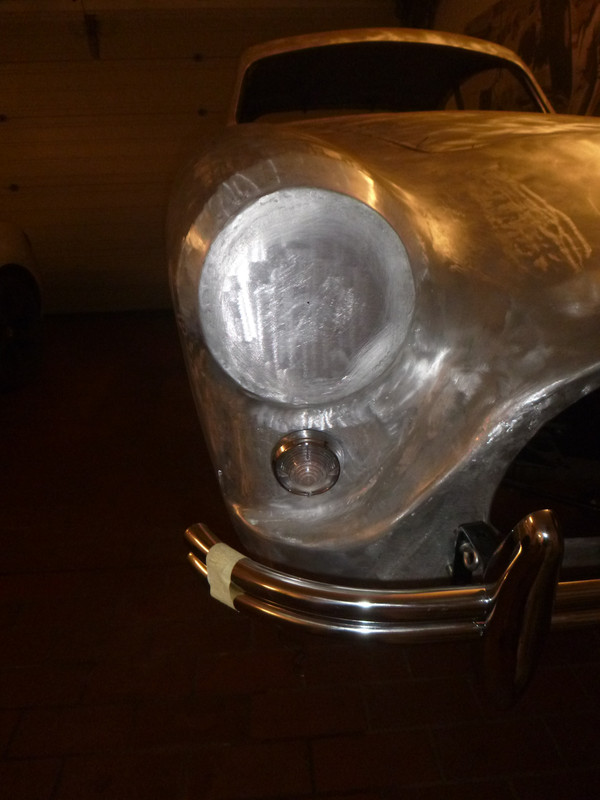
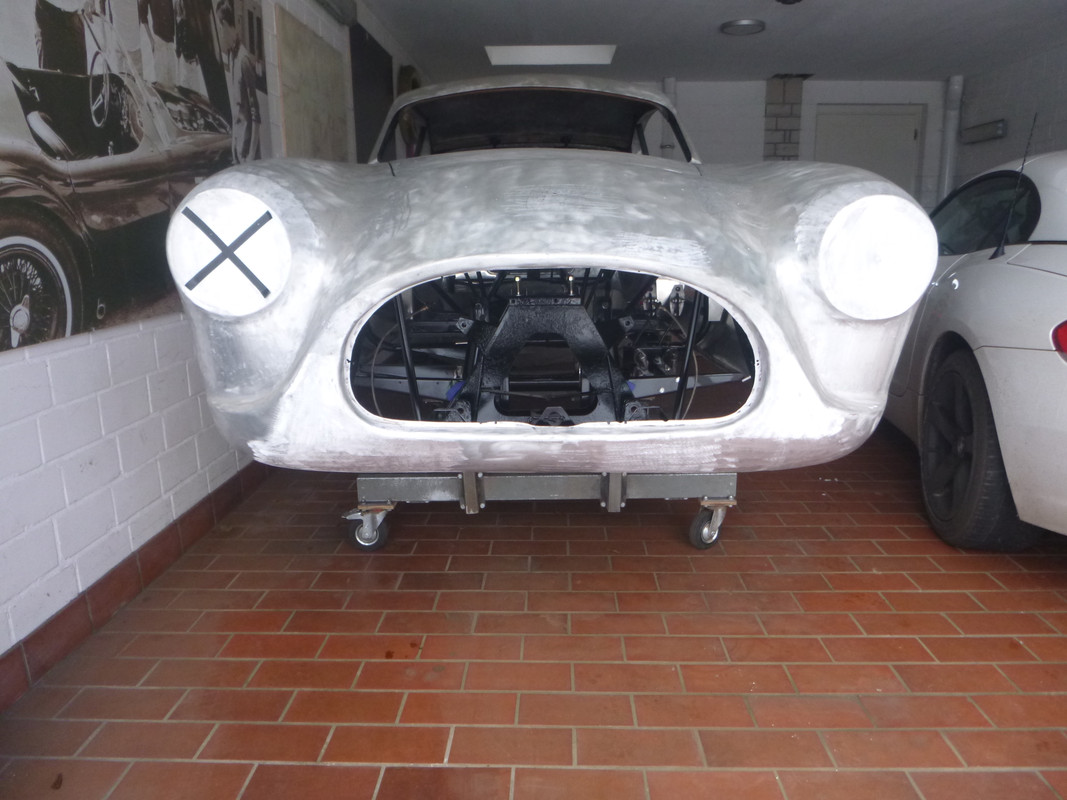
You can see that the head light section was completely re-newed since the old version was in such a terrible condition that it wasn't possible to adjust the head lights. The ugly rectangle indicator lamps should be replaced by the Lucas 539 style lamps.

Now, I have to find the middle of the head light section. Not so easy as it seems. First a cardboard model of the head light chrom ring with a defined center must be constructed. This model can be arranged in the section such it looks quite ok. After the center is transfered from the cardboard model to the aluminium I can identify the line on which the indicator lights should be placed.

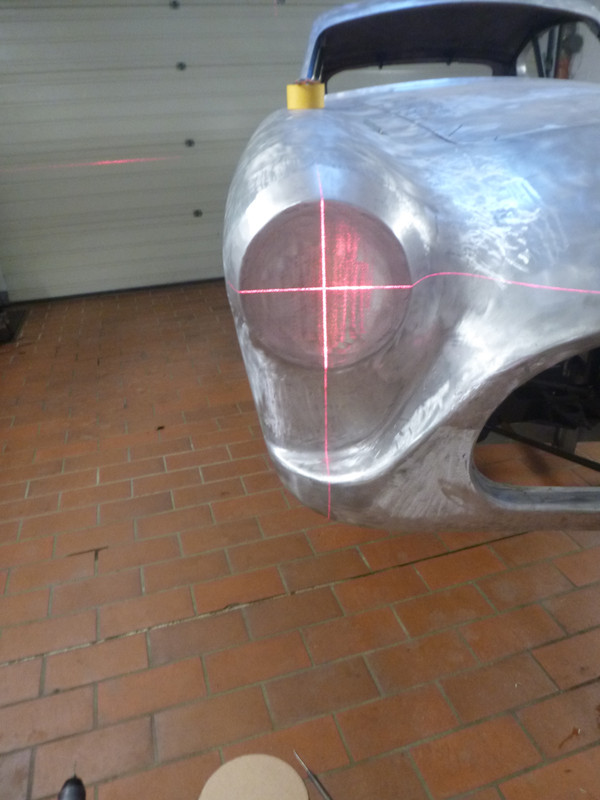
Unfortunately, to identify the heights of the mounting holes of the indicator lamps the front bumper should be installed. Also these holes were closed since the old ones were frayed. This complete tasks took some hours. Here is the result.