Author Topic: BE 646  (Read 210477 times)

dkp_cobra

  • Hero Member
  • *****
  • Posts: 931
    • View Profile
BE 646
« Reply #120 on: December 28, 2012, 12:12:01 »
Time for some updates. In the meantime a made a new rubber for the upper steering column:


   and the engine mounts are finished:


   so time to put the engine into the car and check whether the steering rack and column will find a way around the engine. Instead of the UJ shaft Ben supported I plan to use and old Triumph TR4 shaft:


   It seems that the drive shaft I got together with the engine and gear box from the a Kirkham 289 cobra will also fit with my setup:


   The footbox must be modified for the clutch:


   The modified drive flange of the Jag differential are finished.


   Now, they fit into the rear cage.


   Between the differential case and its mounting brackets is a little space:


   and this is at least what is missing on top of the case to the frame:


   I am afraid I have to do these again [xx(]
« Last Edit: April 21, 2018, 13:14:25 by dkp_cobra »

Gus Meyjes

  • Hero Member
  • *****
  • Posts: 729
    • View Profile
BE 646
« Reply #121 on: December 28, 2012, 17:32:28 »
Peter
   
   For whatever it's worth: I have the Yates conversion on my Aceca and I love it. It works fantastic.
   
   Gus

dkp_cobra

  • Hero Member
  • *****
  • Posts: 931
    • View Profile
BE 646
« Reply #122 on: February 10, 2013, 11:34:11 »
I made new mounting brackets for the differential case. Left the old one, right the new one:


   This lowered the differential be 5 mm in order to give more space above. And yes, it works:


   A drawback was that the differential case had to be modified a little bit:


   I also made a mounting bracket for the gearbox. First, the original brackets had to be shortened because the Hurst shifter of the Top-Loader hit them in the rear gear.


   Then new holes had to be drilled. Not so easy since there is no space for a drilling machine:


   Time to buy a new tool:


   This was good for one and a half hole. After that it was junk. The next right-angle drive was better, good enough for the rest two and a half holes but still not the kind of tool I like to work with. Now, I am looking for some professional tool.
   
   Nevertheless, the gear box bracket is finished:


   Now, all these parts can be welded professionally.
« Last Edit: April 21, 2018, 13:15:02 by dkp_cobra »

dkp_cobra

  • Hero Member
  • *****
  • Posts: 931
    • View Profile
BE 646
« Reply #123 on: March 06, 2013, 09:53:03 »
The project is stucked a little bit. It started in October. I just wanted to install Ben's steering rack conversion kit. I thought this a little nice sub-project with a fast success. Well, installing the rack was really done on a friday afternoon but installing the steering column is problematic.
   
   The problem is not Ben's kit. This is great. The problem is my conversion of the car to a 289 engine, the swap from RHS to LHS and that the foot box was strongly modified by one of the previous owners.
   
   The first observation was that the lower steering rack will go through the oil filter. So I had to order a oil take-off adapter. I hoped for more space in that area due to the adapter but it is still a narrow area. It is not possible to say whether this will work without fixing the upper steering column. But the position of the upper column depends on the space the engine headers give me. So again a suspension of this fast-to-do sub-project.
   
   In the meantime I thought about construction of a new pedal box. I would like to install an adjustable brake-balance system which will make the box wider than the original box is. Whether I will have the space or not depends on the way the exhaust pipes will go, and, yes, this depends on the header. So, same suspension of this sub-project.
   
   Another sub-project was a new construction of the dash board. The lower line of the dashboard has a curve in the area of the steering column. To make this nice I have to be sure where the steering column is located. I think I mentioned a quite similar problem above.
   
   Now, I thought I found a real nice sub-project: the restauration of the original ACOC emblem.


   I wanted to remove the rest of the enamel, clean it and make a new enamel coating. After cleaning and polishing I has to notice that first the emblem must be chromed first.


   But hey, last week my headers arrived [:)]. There is only one thing which prevents my from continuing: my sinusitis [xx(]
« Last Edit: April 21, 2018, 13:15:32 by dkp_cobra »

dkp_cobra

  • Hero Member
  • *****
  • Posts: 931
    • View Profile
BE 646
« Reply #124 on: March 12, 2013, 14:11:33 »
Finally, I found a nice small sub-project I could do in my warm office on my desk. Together with the engine I got a Holley Street Avenger carburator with an electric choke. I asked Holley how I convert it to a mechanical choke and they recommended the Holley 45-225S conversion kit:
   
https://www.holley.com/products/fuel_systems/carburetor_components/choke_and_vacuum_secondary_components/choke_components/parts/45-225S
   
   These bits and pieces come with a description which has a little room for improvements. No pictures, no drawing, nothing: 
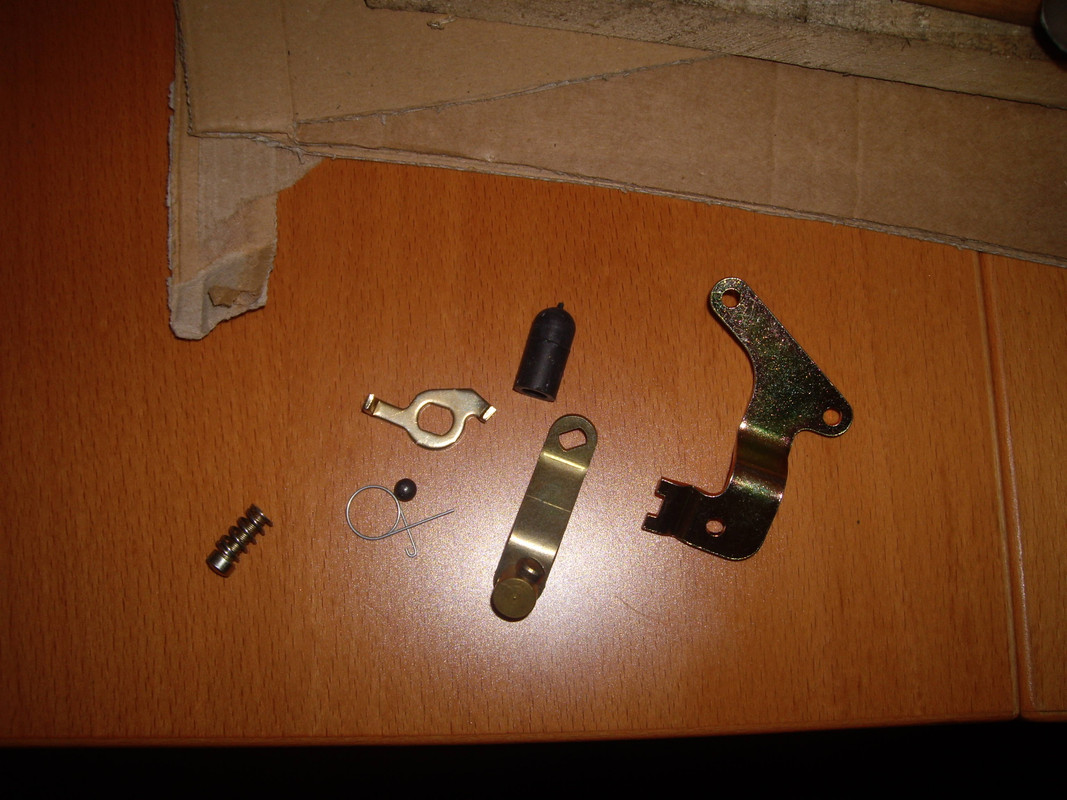
http://www.holley.com/data/Products/Technical/199R7439rev1.pdf
   
   Furthermore, the parts I got where different from the parts the original Holley picture shows above [B)]. I have to say, these Holley guys know how to drive up there customers. I asked for some more detailed installation guide and got really fast the answer "no, sir, nothing available". In the meantime I know why, because writing a detailed description would had shown them that this conversion kit doesn't work.
   
   After asking the vendor the second step is always "google". It shows quite fast that this conversion is nothing people do quite often. But those poor guys how tried had always the same problem as I had "what should I do with these small parts"?
   
   So, to help the next guy here comes my try to figure this conversion. Now, the line for "google":
   
   <font size="4"><b>How to convert a Holley Street Avenger electric choke to a mechanical choke using the Holley 45-225S choke conversion kit?</b></font id="size4">
   
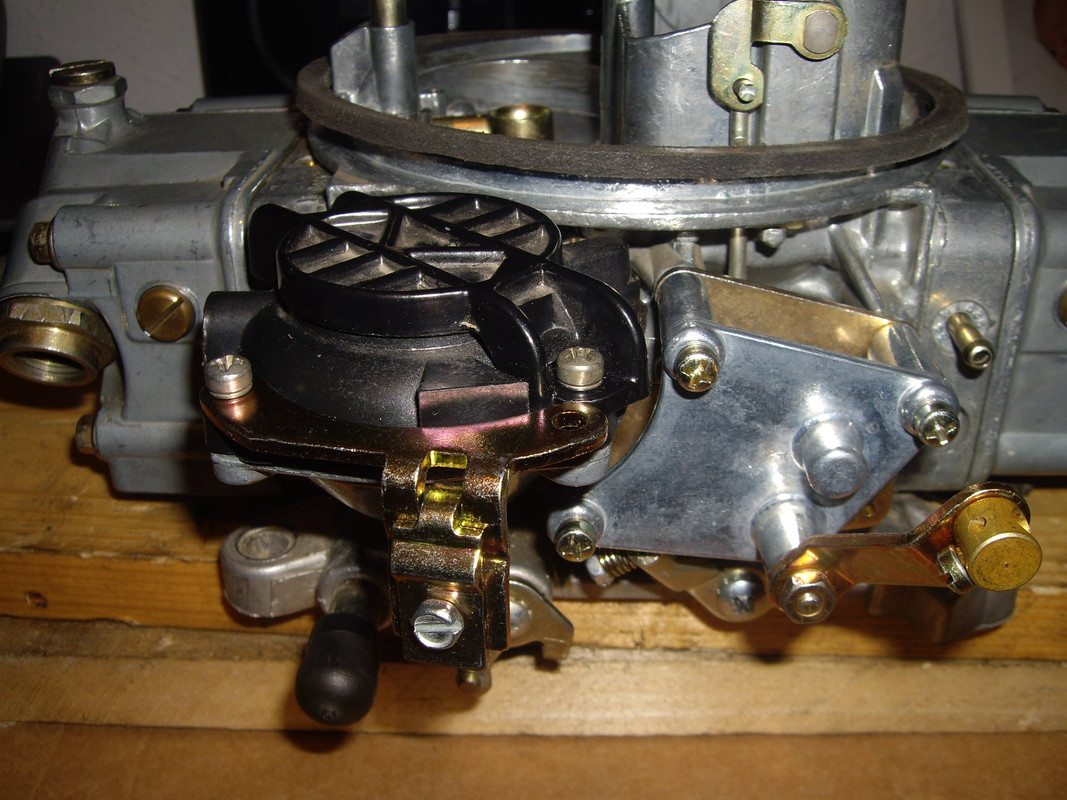
   First, the electric choke must be removed:


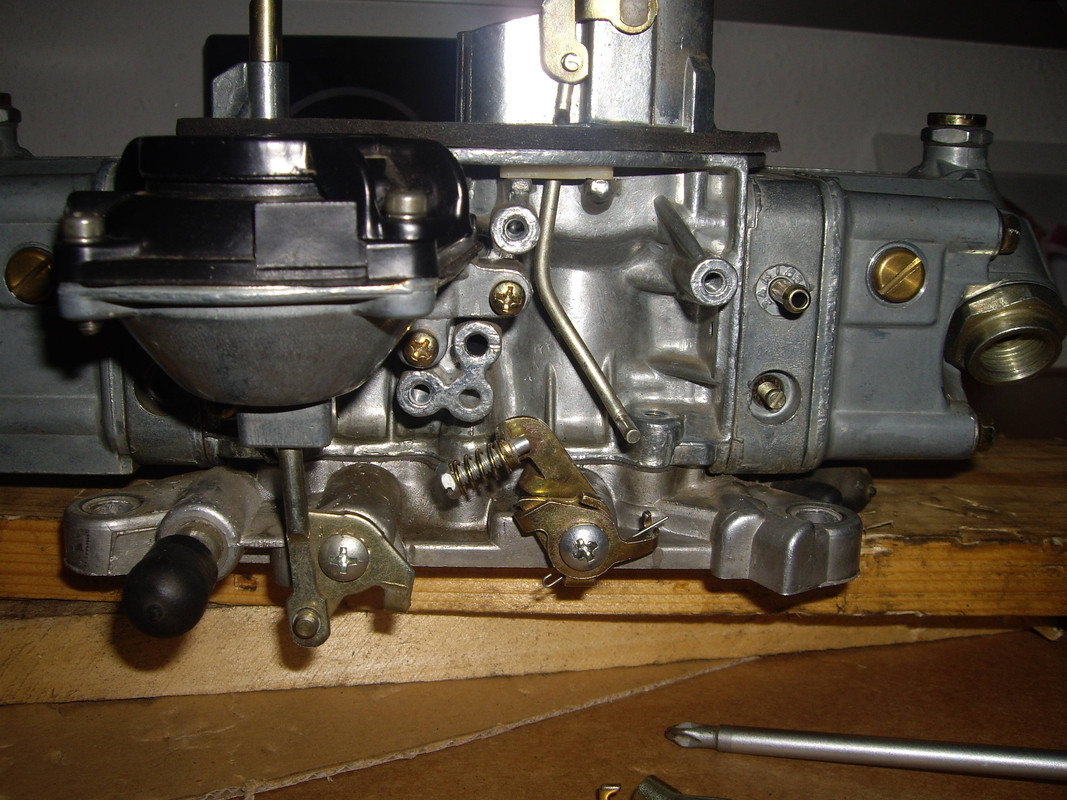
   The choke vacuum passage must be closed (red arrow). The kit contains a small lead ball which should be driven into the hole. I think using some kind of fibre ribbon is a better solution. The fast idle lever must be removed because it will clash with the choke lever:


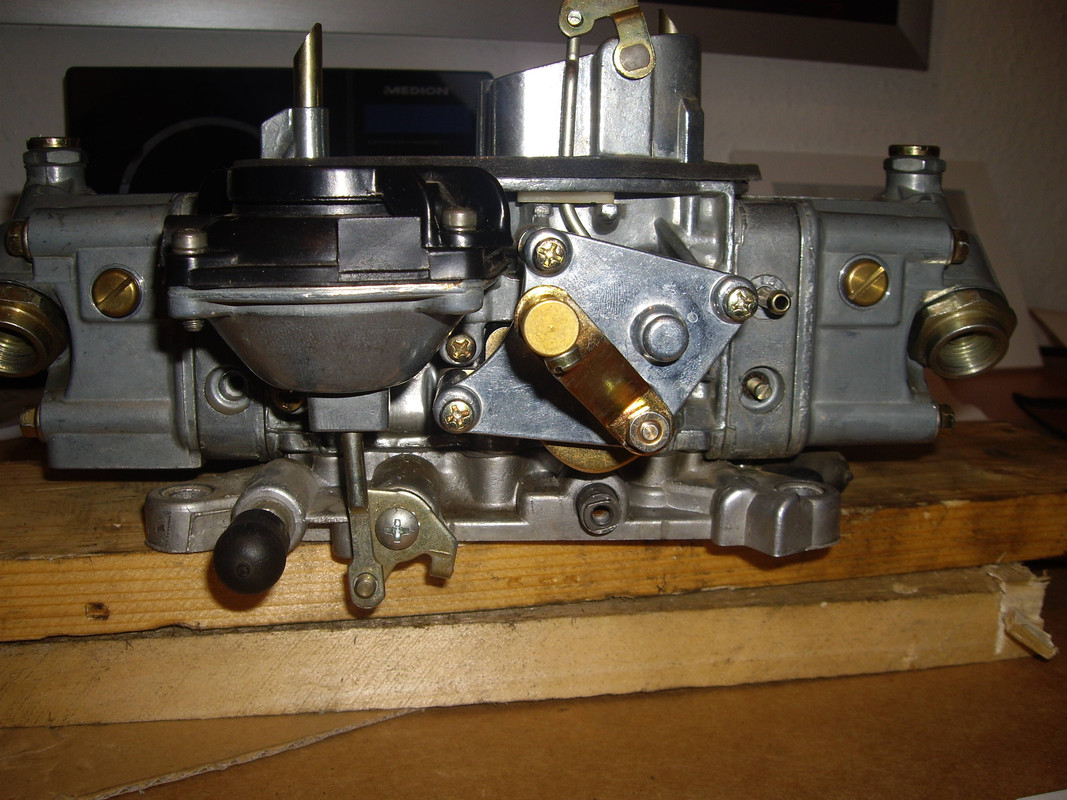
   Now, you can mount the choke lever stamping. The lever is turned clockwise in order to load the spring. Don't forget the hair pin you got from the electric choke. There is no new hair pin in the conversion kit.


   Mount the die cast fast idle cam housing assembly:


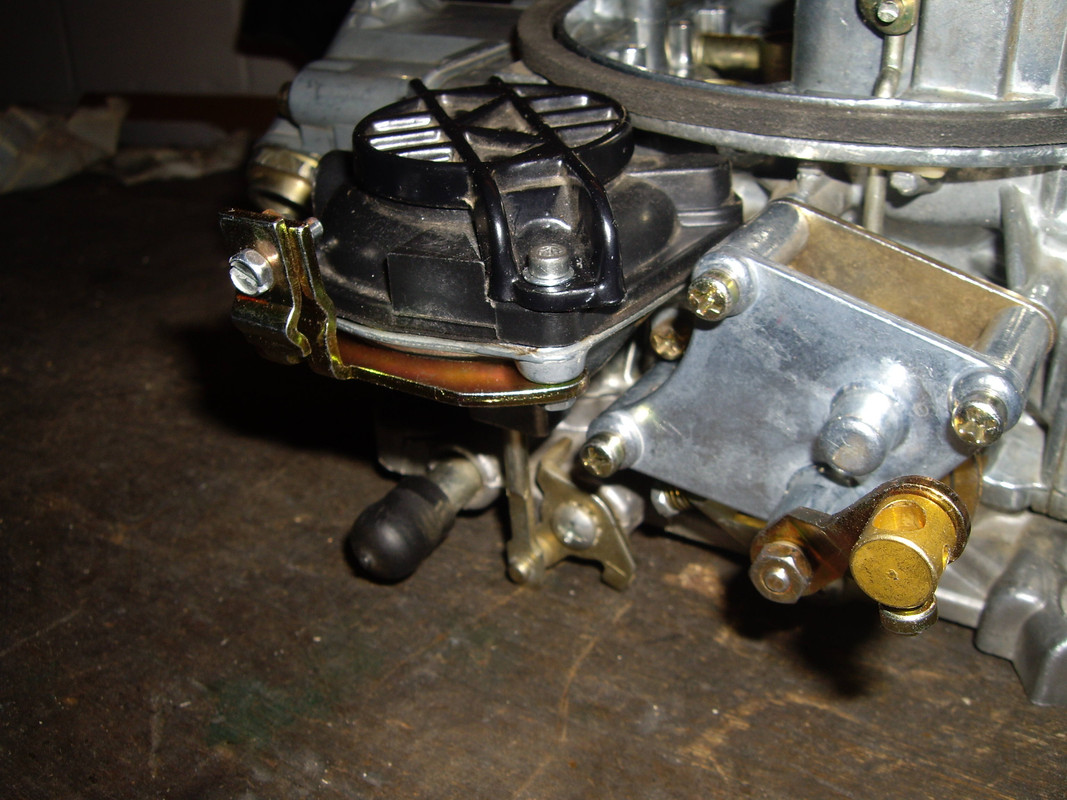
   After mounting the fast idle lever coming with the conversion kit (forget step 6-8 of the installation instructions) you can see, that this will not work. There is a big gap between the fast idle lever and the drive of the choke lever:


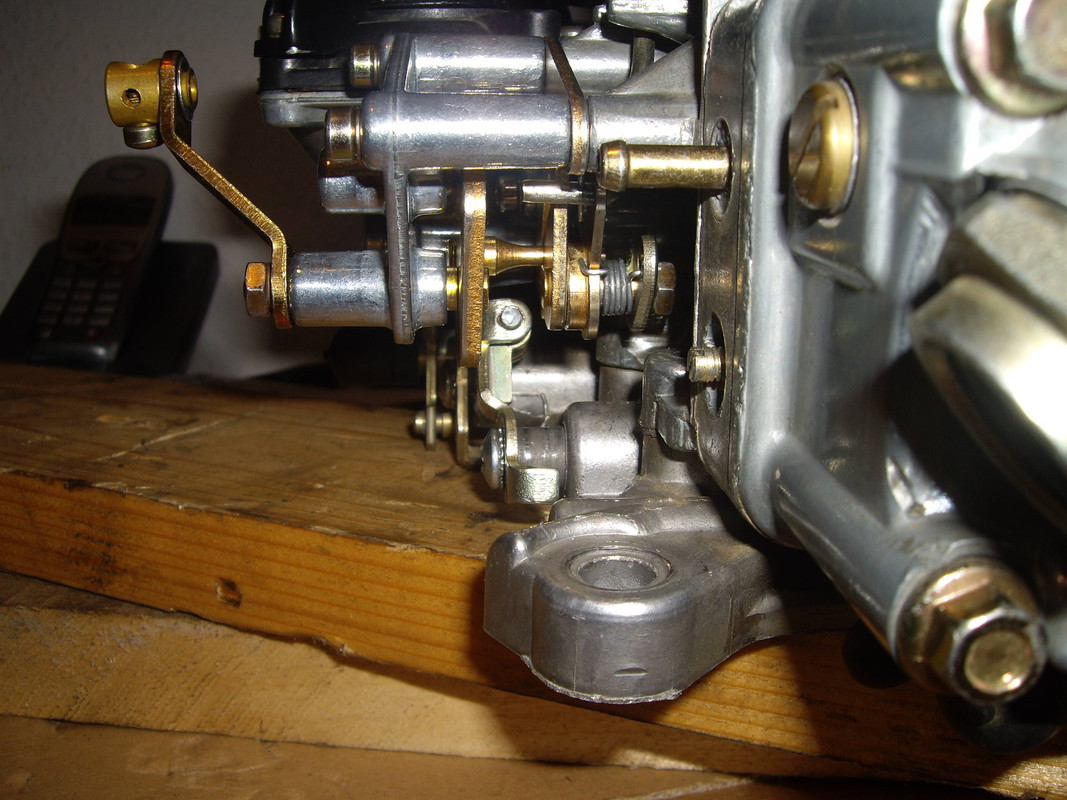
   Bend the fast idle lever outwards approx. 5 mm:


   The installation instruction describes in step 5 how to mount the choke cable bracket. This is the result:


   You have to machine the housing and the cap of the secondary diaphragm cover. I think a better solution without machining is a flipped up mouting of the cable bracket from below:


   That's it. I hope these pictures will help someone. Needless to say, that a lot of parts are left over [:D]
   
« Last Edit: April 21, 2018, 13:17:10 by dkp_cobra »

3.8Jaguar

  • Jr. Member
  • **
  • Posts: 83
    • View Profile
BE 646
« Reply #125 on: March 18, 2013, 16:33:10 »
Your speedo drive original problem is down to the common problem of the direction of winding on the drive cable there are left hand and right hand wound cables so if incorrect cable is fitted for direction of drive they can try and unwind if there is drag in the system.
   
   The Moss box does appear to be a Jaguar unit, the AC Moss boxes were centre lever in top cover and had a different tail housing with a large two bolt hole rear mounting plate cast in.
   
   If you go with a Salisbury final drive, which is possible double check you have the right final drive ratio as there were a large number of ratios used in Jaguars, if you don't check and fit one out of an Automatic XJS for instance we will see you ant Bonneville Salt flats trying to join the 200MPH club!

dkp_cobra

  • Hero Member
  • *****
  • Posts: 931
    • View Profile
BE 646
« Reply #126 on: March 19, 2013, 10:05:37 »
James,
   
   200 mph is my aim [:)]. The Jag differential is a 3.07 with limited slip. The gear box I will use is a top-loader with a 1:1 forth gear. All together it will not be an acceleration beast but it will be a nice cruiser.
   
   Thank you for your advice.
   
   Peter

dkp_cobra

  • Hero Member
  • *****
  • Posts: 931
    • View Profile
BE 646
« Reply #127 on: March 23, 2013, 15:45:01 »
I installed my block hugger style headers.


   I had to learn that block hugger style means that the exhaust pipes go inside the frame. Since US cars has a much wider frame than the Aceca my problem is that the headers point directly to the frame:


   The next step will be a custom made header [xx(]
   
   A little bit frustated I had a closer look at my doors. When I bought the car I opened the right door and saw a lot of rot (see pictures on page 1). I expected not the best.
   
   The right door:


   The rot is mainly in the lower part. This must be replaced. Of course the two thin wood plates around the door pocket are decayed. But it is not so bad as I expected. I thought that the complete door must be renewed.
   
   The left door is much better. The lower part is fine, only the struts to the side are not perfect:


   The boot lid makes a even better impression. Only small things are decayed here:
   
« Last Edit: April 21, 2018, 13:17:42 by dkp_cobra »

dkp_cobra

  • Hero Member
  • *****
  • Posts: 931
    • View Profile
BE 646
« Reply #128 on: March 30, 2013, 16:49:58 »
While thinking about my headers it is time for some real dirty work. First, I pitched a tent inside of my garage in order to remove the color from the doors, the bonnet and the hatch door.


   After the work the view wasn't so good.


   The result:


   After stripping the doors they were 1750g lighter.


   The right door (the one with the dilapidated wood) has also an open edge at the backside.


   The doors will be a lot of work. I look forward to strip the rest of the car. I will start when I will be able to move again [B)]
« Last Edit: April 21, 2018, 13:18:06 by dkp_cobra »

dkp_cobra

  • Hero Member
  • *****
  • Posts: 931
    • View Profile
BE 646
« Reply #129 on: May 07, 2013, 16:11:39 »
only little progress: overhauling of the heater vents


« Last Edit: April 21, 2018, 13:18:19 by dkp_cobra »

Gus Meyjes

  • Hero Member
  • *****
  • Posts: 729
    • View Profile
BE 646
« Reply #130 on: May 08, 2013, 03:15:38 »
Peter,
   
   The headers arrived in Holland. A bit of bad info: My mother got taxed for them... 85 Euro... [:(!][:(!][:(!]
   
   Gus

dkp_cobra

  • Hero Member
  • *****
  • Posts: 931
    • View Profile
BE 646
« Reply #131 on: May 09, 2013, 13:09:21 »
quote:
Originally posted by Gus Meyjes
   
Peter,
   
   The headers arrived in Holland. A bit of bad info: My mother got taxed for them... 85 Euro... [:(!][:(!][:(!]
   
   Gus


   Gus,
   
   I'll install an extra bell for that at your bicycle [:I]
   
   Peter

dkp_cobra

  • Hero Member
  • *****
  • Posts: 931
    • View Profile
BE 646
« Reply #132 on: May 09, 2013, 13:10:53 »
New hand-made stainless steel brackets for the clutch and brake fluid reservoirs:
   
« Last Edit: April 21, 2018, 13:18:36 by dkp_cobra »

dkp_cobra

  • Hero Member
  • *****
  • Posts: 931
    • View Profile
BE 646
« Reply #133 on: May 15, 2013, 11:54:07 »
I got new headers from Gus. Patriot headers for AC Cobra 289 so they should fit.


   This looks promising:


   But first the pedal box and the remain of the crossbrace must be removed:


   Currently, I have contact of the right header with the frame


   but at least 2 cm space on the left side


   I am sure that with modified engine mounts it will work.
« Last Edit: April 21, 2018, 13:18:51 by dkp_cobra »

dkp_cobra

  • Hero Member
  • *****
  • Posts: 931
    • View Profile
BE 646
« Reply #134 on: May 24, 2013, 15:36:08 »
The old bumper bar end plugs are so rusty that they cannot be overhauled. I bought new stainless steel end caps, of course not with the correct size. It's hard to get these inch stuff here in germany. But after some work at the lathe they fit:


   The bumper bar pipes wait for polishing:


   I modified one of the engine mounts:


   The engine can now be placed in the middle of the centerline of the car. The header has now place on both sides of the main frame:


   But the header still contacts the engine mounts:


   I will build new smaller mounts and the problem should be solved.
   
   And now something completey new: a picture quiz. What will this be at the end?
   
« Last Edit: April 21, 2018, 13:19:24 by dkp_cobra »