

31
News:
SMF - installed December 2017.
Returning members - please use the 'Forgot Password' function when logging in to the new Forum for the first time. If you have changed your email address please let me know so I can update it.
 Show Posts
This section allows you to view all posts made by this member. Note that you can only see posts made in areas you currently have access to.
32
Ace, Aceca & Greyhound Forum / Re: BE 646
« on: February 09, 2023, 18:58:02 »
Hi Luke,
I have a stupid question: what is the difference between a header and an expansion tank?
I want to switch from an open to a closed cooling water system. The standard radiator is closed on the top. The old radiator cap is only a fake. So, I need an expansion tank and that will be the Harrison tank.
Regards, Peter
33
Ace, Aceca & Greyhound Forum / Re: BE 646
« on: February 09, 2023, 17:34:01 »
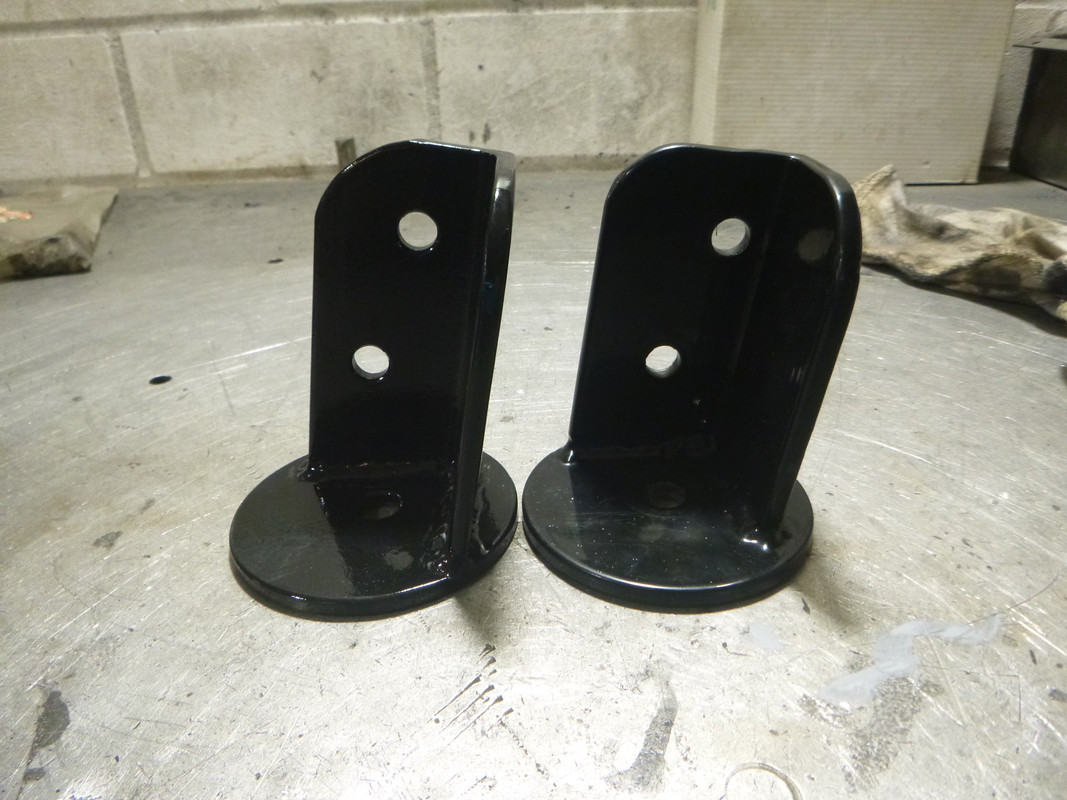
Daddy got a new toy: a set of dimple dies 


I had to test them at three panels.

Together they are a bracket for the expansion tank.

Installation in the car:


I had to test them at three panels.
Together they are a bracket for the expansion tank.
Installation in the car:
34
Ace, Aceca & Greyhound Forum / Re: BE 646
« on: December 17, 2022, 12:17:20 »Hello!I used "MIKE SANDER's Anticorrosion Grease": https://www.kamebo.com/Corrosion-Prevention-Chemicals/Grease-Tape/MIKE-SANDERs-Anticorrosion-Grease-Tape-50-mm-x-10-Meters::604.html?language=en
wich kind of tape did you used? Petrolatum "Denso" tape?
Thanks!
35
Ace, Aceca & Greyhound Forum / Re: BE 646
« on: December 10, 2022, 18:25:46 »
Installing some bits and pieces


The inside rearview mirror is a little bit strange. I think the construction is for a top mounting position and not for a bottom mounting on the dashboard as in the Aceca.


The lever of the Lucas dipping mirror is on the top and the Lucas lettering is upside down. But with another center stem it should be possible to turn the mirror.


Now, it should work.


The inside rearview mirror is a little bit strange. I think the construction is for a top mounting position and not for a bottom mounting on the dashboard as in the Aceca.
The lever of the Lucas dipping mirror is on the top and the Lucas lettering is upside down. But with another center stem it should be possible to turn the mirror.
Now, it should work.
36
Ace, Aceca & Greyhound Forum / Re: BE 646
« on: December 02, 2022, 18:57:45 »
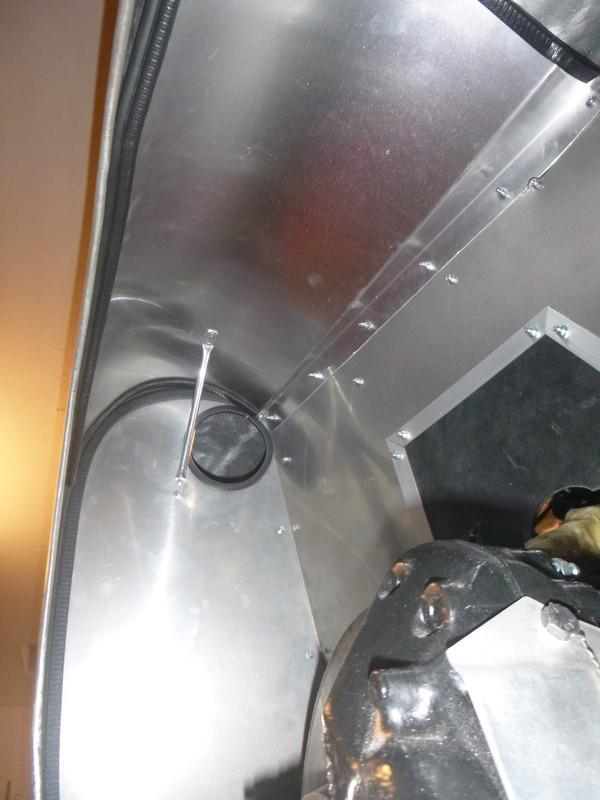
This position for the venting hose wasn't perfect. I was afraid that the hose would hit the front wheels.

The new design allows the hoses a higher position more away from the front wheels.


Makeing some clamps to the venting hoses

Now, the hoses are installed.


Enough space for the hoses not to get hit by the wheels.


The new design allows the hoses a higher position more away from the front wheels.
Makeing some clamps to the venting hoses
Now, the hoses are installed.
Enough space for the hoses not to get hit by the wheels.
37
Ace, Aceca & Greyhound Forum / Re: BE 646
« on: December 02, 2022, 18:46:44 »
Thomas, indeed it is a quite long time ago that I started this project. My daughter was a little bit more than half a year old when the car arrived. My plan was to take the car for her first school day. Well, now she is in class seven (7!!!). My next (current) plan is to take the car to drive my daughter to her prom. So, six and a half year left. That's easy 
The project is much bigger than I ever expected and I must say it is a little bit too much for an "in the garage at you home" project. Nevertheless, I missed the point of no return many years ago and I learned so much I don't want to miss this experience.
The project is much bigger than I ever expected and I must say it is a little bit too much for an "in the garage at you home" project. Nevertheless, I missed the point of no return many years ago and I learned so much I don't want to miss this experience.
38
Ace, Aceca & Greyhound Forum / Re: BE 646
« on: November 25, 2022, 16:59:22 »
Now, the stone protection is installed inside in the front fenders


39
Ace, Aceca & Greyhound Forum / Re: BE 646
« on: November 11, 2022, 17:11:58 »
After the summer holidays I wanted to install the engine. Hopefully for the last time. I was sure that the task would take more than 5 minutes but didn't expect bigger problems. Well ...
It was a quite tight job


Although I installed the engine several times at the end the fitting was not perfect. The rear mounting rubber holding the gear box was misaligned by approximately 3 mm.

So I made new engine mounts to allow the complete drive train shifting 3 mm to the front.

Nearly no difference between the old and the new part ...
... but with a much better alignment at the gear box mounting rubber

Also the bonnet fits perfectly


After that I wanted to install the inner front fender. I had to learn that it is not the best idea to make the inner panels before the car goes to the body shop. Next time I will do this after the job at the body shop is finished to save some time. To make a long sad story stort: I have new inner front fender this time they are two parted for easy installation.


Don't miss the rubber sheets. Not pop rivetted as original but screwed to make the parts removable.


It was a quite tight job
Although I installed the engine several times at the end the fitting was not perfect. The rear mounting rubber holding the gear box was misaligned by approximately 3 mm.
So I made new engine mounts to allow the complete drive train shifting 3 mm to the front.
Nearly no difference between the old and the new part ...
... but with a much better alignment at the gear box mounting rubber
Also the bonnet fits perfectly
After that I wanted to install the inner front fender. I had to learn that it is not the best idea to make the inner panels before the car goes to the body shop. Next time I will do this after the job at the body shop is finished to save some time. To make a long sad story stort: I have new inner front fender this time they are two parted for easy installation.
Don't miss the rubber sheets. Not pop rivetted as original but screwed to make the parts removable.
40
Ace, Aceca & Greyhound Forum / Re: Aceca hatch back fixing question
« on: October 15, 2022, 10:35:17 »HelloChris,
AE513 is almost complete, just finishing the interior re-trim. I would like to know how the arm that holds the hatchback open should be attached to the body of the car? Mine was with 4 self tapping screws into the aluminium internal wing. Is this correct? Feels like it should be nuts&bolts
Regards
Chris
you are correct in both ways. Yes, only 4 self tapping screws are used but nuts&bolts would be better. Best would be to use a bigger aluminium plate under der internal wing in the area where you use the nuts resp. rivet nuts.
Regards,Peter
41
Ace, Aceca & Greyhound Forum / Re: BE 646
« on: July 27, 2022, 17:49:57 »
David updated the table of contents and the subject index. Thank you David.
42
Ace, Aceca & Greyhound Forum / Re: BE 646
« on: July 27, 2022, 17:49:04 »Always a pleasure to see your updates. Your fuel tank build is very impressive. I had mended the leaks in my original tank and used an air mattress inflator, then sprayed on soapy water, but you're fully submerged technique is more thorough. Also interesting to note that Aceceas had a single fuel pick up where as Aces (certainly mine) have a pick up on each side, one for the mechanical pump and one for the extra electric pump.Now I know why the original fuel tank had two pick up. Well, I have a high volume fuel pump and I hope it will be enough.
James
43
Ace, Aceca & Greyhound Forum / Re: BE 646
« on: July 20, 2022, 18:05:56 »
Last update before holidays.
The draft tube for the tank:


After a little hand-brushing the fuel tank is ready for installation. Some pictures showing the old and the new fuel tank:


and installed in the car:


Now, it's time for the fuel pipe:


Installation of the rear exhaust pipes. Now, they don't hit the fuel tank anymore.


The fuel pipe connecting the fuel filler cap with the fuel tank must be covered.

The old cover doesn't fit anymore. A new cover wasn't so easy to make since the form is quite organic. When you try to close a 3 mm gap at the top you get a new 7 mm gap at the right lower corner. Closing this makes things even more worse


Before I fix it with some bolts I upholster the cover with leather because the thickness of the leather leads to different mounting points.


Good time to make also the cover for the opposite side.


And the best thing is that the spare wheel cover still fits. Well, after some modifications of one outline ...


At the end something complete different. I think I found an replacement for the PVC filler in the rain gutter. Right the original one and left my replacement. It's a little bit higher.

But I am satisfied with the look.


The draft tube for the tank:
After a little hand-brushing the fuel tank is ready for installation. Some pictures showing the old and the new fuel tank:
and installed in the car:
Now, it's time for the fuel pipe:
Installation of the rear exhaust pipes. Now, they don't hit the fuel tank anymore.
The fuel pipe connecting the fuel filler cap with the fuel tank must be covered.
The old cover doesn't fit anymore. A new cover wasn't so easy to make since the form is quite organic. When you try to close a 3 mm gap at the top you get a new 7 mm gap at the right lower corner. Closing this makes things even more worse
Before I fix it with some bolts I upholster the cover with leather because the thickness of the leather leads to different mounting points.
Good time to make also the cover for the opposite side.
And the best thing is that the spare wheel cover still fits. Well, after some modifications of one outline ...
At the end something complete different. I think I found an replacement for the PVC filler in the rain gutter. Right the original one and left my replacement. It's a little bit higher.
But I am satisfied with the look.
44
Ace, Aceca & Greyhound Forum / Re: Gearbox for zephyr engine
« on: July 03, 2022, 16:13:51 »
Fintan,
if your really want to go the Zephyr / Ford Type 9 way please have a look at my short thread (https://www.acownersclub.co.uk/forum/index.php?topic=1515.0) about my Aceca restoration because I went this way already.
Peter
if your really want to go the Zephyr / Ford Type 9 way please have a look at my short thread (https://www.acownersclub.co.uk/forum/index.php?topic=1515.0) about my Aceca restoration because I went this way already.
Peter
45
Ace, Aceca & Greyhound Forum / Re: BE 646
« on: July 02, 2022, 08:36:21 »
While looking at ebay.co.uk I found a seller from Canada who offers hand modified car model. Funny, he also has my car:
https://www.mimodels.com/catalog/1959-ac-aceca-bristol-monte-carlo-rally-108-p-1248.html?osCsid=612v8sjea9ikutrvpjsg83ma42

But I think 235 canadian dollars is not really a bargain for this kind of quality, is it.
https://www.mimodels.com/catalog/1959-ac-aceca-bristol-monte-carlo-rally-108-p-1248.html?osCsid=612v8sjea9ikutrvpjsg83ma42
But I think 235 canadian dollars is not really a bargain for this kind of quality, is it.