Author Topic: 'tool time' story: how I recreate my MK 4  (Read 105392 times)

cobham cobra

  • Sr. Member
  • ****
  • Posts: 497
    • View Profile
'tool time' story: how I recreate my MK 4
« Reply #150 on: September 26, 2008, 12:17:03 »
Now you know how the MkIV bolts together, can I book my car in for refurbishment once you have finished yours ?
   John.[:)][:)]

dkp_cobra

  • Hero Member
  • *****
  • Posts: 933
    • View Profile
'tool time' story: how I recreate my MK 4
« Reply #151 on: September 26, 2008, 17:54:48 »
quote:
Originally posted by cobham cobra
   
Now you know how the MkIV bolts together, can I book my car in for refurbishment once you have finished yours ?
   John.[:)][:)]


   Ok, but first I have to work as a summer associate at Steve's garage [:)]

dkp_cobra

  • Hero Member
  • *****
  • Posts: 933
    • View Profile
'tool time' story: how I recreate my MK 4
« Reply #152 on: September 27, 2008, 12:59:54 »
Some progress with the carpet:


   You can see the difference between the old black put pile and the new Boucle.
« Last Edit: April 18, 2018, 10:08:06 by dkp_cobra »

dkp_cobra

  • Hero Member
  • *****
  • Posts: 933
    • View Profile
'tool time' story: how I recreate my MK 4
« Reply #153 on: October 17, 2008, 17:17:25 »
Some more progress with the carpet:


   And of course the glove box has the same carpet [:)]
   
« Last Edit: April 18, 2018, 10:08:52 by dkp_cobra »

dkp_cobra

  • Hero Member
  • *****
  • Posts: 933
    • View Profile
'tool time' story: how I recreate my MK 4
« Reply #154 on: November 07, 2008, 12:17:58 »
Before some of you start thinking that I quite: no, I have to work [V]. But I finished my carpet sub-project even in the boot:


« Last Edit: April 18, 2018, 10:09:53 by dkp_cobra »

dkp_cobra

  • Hero Member
  • *****
  • Posts: 933
    • View Profile
'tool time' story: how I recreate my MK 4
« Reply #155 on: November 21, 2008, 17:00:55 »
Due to https://www.stainlessparts.co.uk/ I was able to mount my wind deflectors and and my sun visors. Also the exterior mirror got its place.
   
« Last Edit: April 18, 2018, 10:10:20 by dkp_cobra »

dkp_cobra

  • Hero Member
  • *****
  • Posts: 933
    • View Profile
'tool time' story: how I recreate my MK 4
« Reply #156 on: November 22, 2008, 14:24:22 »
Today, I wanted to install the belt harness. I cut two slots into the rear wall behind the seats:
   
   (Backside)

   
   (Frontside)

   
   The slots are much bigger than I need for the belt but I want to ensure that the belt cannot rub at the aluminium. Thus I made two rubber parts to direct the belt together with two brackets to fix the rubber at the rear side of the backwall.


   Here you can see the result just before the carpet is fixed back by the hook-and-loop tape:


   And here the final result in the cockpit:


   The belts are mounted at the rear frame of the chassis. That should be strong enough:


   Now, you can see why I installed a deviation point in the boot last year. The belt doesn't rub at the tank:


« Last Edit: April 18, 2018, 10:13:04 by dkp_cobra »

dkp_cobra

  • Hero Member
  • *****
  • Posts: 933
    • View Profile
'tool time' story: how I recreate my MK 4
« Reply #157 on: November 28, 2008, 12:00:01 »
My mounting bracket for the brake fluid reservoir:


   ... installed in the engine bay (not yet finished):


« Last Edit: April 18, 2018, 10:14:04 by dkp_cobra »

dkp_cobra

  • Hero Member
  • *****
  • Posts: 933
    • View Profile
'tool time' story: how I recreate my MK 4
« Reply #158 on: December 13, 2008, 16:39:42 »
Do you remember my idea to displace the brake fluid reservoir?


   Maybe it was a nice idea but a bad design. For the cone part I had to use two sealing washer but the thread wasn't long enough. So I used no washer but teflon tape. This doesn't work. The connection is not really close and transude brake fluid. That's maybe ok for a gear but not for a brake system.
   
   So, next idea: I cut a MF 18x1,5 thread into the brake master cylinder to use a fitting D04 -> MF 18x1,5 (offered from Thinkauto). Using a sealing washer this should work:


   Good time to recondition the brake master cylinder:
   
« Last Edit: April 18, 2018, 10:15:46 by dkp_cobra »

dkp_cobra

  • Hero Member
  • *****
  • Posts: 933
    • View Profile
'tool time' story: how I recreate my MK 4
« Reply #159 on: January 16, 2009, 15:43:09 »
The last weeks I spent a lot of time with small things. Hardly worth to mention like the mandatory pedals with AC logo:


   I have mounted a master switch to be save the battery during the long winter months:


   And the washer motor has found it's place behind the dashboard and it works fine:


   In the meantime I have three (3 !!!) different rotary switches from lucas for the windscreen wiper. All of them have a push mechanism to switch on the washer motor. Testing these switches together with the wiper motor often results into short-curcuits and sometimes into fume. Thus I decided to simulate these on computer. If anybody of you have a Verilog simulator he my be interested in modelling the motor:
   
   
Code: [Select]
module wiper(inout i1,i2,input i3,inout i4,input i5);
   integer i = 0;

   tranif1 t1(i1,i2,i == 0 || i == 1);
   tranif1 t2(i4,i2,i != 0 && i != 1);

   always #100//@(i or i3 or i5 or i1 or i2 or i3)
begin
case ({i1,i5,i3})
  3'b000: $display("break");
  3'b00Z: $display("break");
  3'b0ZZ: $display("no operation");
  3'b01Z:
begin
   $display("speed 1");
   i = (i+1) % 10;
end
  3'b0Z1:
begin
   $display("speed 2");
   i = (i+2) % 10;
end
  default: $display("error 1=%d 3=%d 5=%d",i1,i3,i5);
endcase
end
endmodule // wiper
   
   and the switch:
   
   
Code: [Select]
module switch39125(input [1:0] pos,inout i1,i2,i3,i4);
   tranif1 t1(i2,i3,pos == 0);
   tranif1 t2(i2,i4,pos == 1);
   tranif1 t3(i1,i4,pos == 2);
endmodule // switch
   
   A typical simulation cycle shows no problems with a correct wiring:


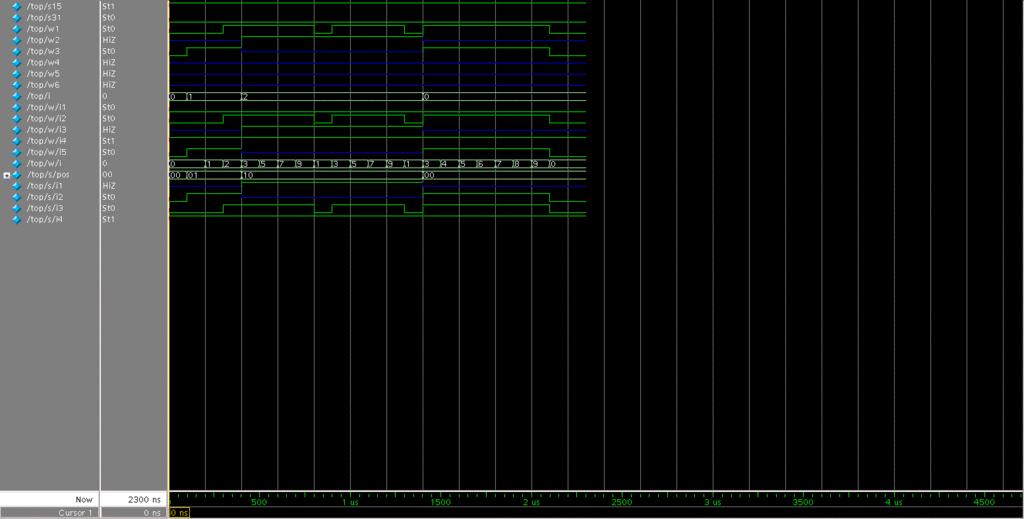
   /top/i models the switch position: 0 is the parking position, 1 is low-speed and 2 is high-speed. /top/w/i is the internal state of the motor. When it is running it counts up to 9 and starts again at 0. You can see that the internal state is increased by 2 during high-speed (/top/i == 2). When the wiper switch is turned back to parking position (/top/i == 0) the increase of the internal status of the wiper motor is 1 in each step which means low-speed but the motor is still running. Reaching the internal state 0 the motor has reached the parking position and the motor stops. During this simulation cycle no signals were red indicating a short-curcuit. That's fine and I can test this wiring in the "real world".
« Last Edit: April 18, 2018, 10:17:24 by dkp_cobra »

dkp_cobra

  • Hero Member
  • *****
  • Posts: 933
    • View Profile
'tool time' story: how I recreate my MK 4
« Reply #160 on: January 24, 2009, 14:40:53 »
Here you can see the original water pipe (left) and the new on the right side.


   The new pipe has no filler neck since I would like to use a Harrison expansion tank from a C2 Corvette.
   
« Last Edit: April 18, 2018, 10:18:34 by dkp_cobra »

dkp_cobra

  • Hero Member
  • *****
  • Posts: 933
    • View Profile
'tool time' story: how I recreate my MK 4
« Reply #161 on: January 28, 2009, 14:13:18 »
Once again I tried to bleed my brake system. With the new fittings it should be leak-free:


   Normaly I use a one-hand bleeding bottle to bleed the brake lines. But due to the construction of the master-brake cylinder it is not possible to bleed it completely with this bottle. Well, at least I wasn't able to do that. A professional bleeding system presses the brake fluid into the reservoir. Than you have to open the bleeding valve at the caliper and all you have to do is to wait until no air is coming out of the caliper. If you don't want to spend some hundred euros for such a system since you use it only every second year you can construct something similar. I mounted a valve from a bicycle tube into an old brake fluid reservoir cap:


   Now, I can press air into the reservoir and let the air out of the system by opening the valves at the calipers.


   You shouldn't use a higher pressure then 1.5 bar. Otherwise the cap get blasted from the reservoir and you have to clean your engine bay. Don't ask how I know [xx(]
« Last Edit: April 18, 2018, 10:19:26 by dkp_cobra »

nikbj68

  • Hero Member
  • *****
  • Posts: 2177
    • View Profile
'tool time' story: how I recreate my MK 4
« Reply #162 on: January 29, 2009, 21:25:28 »
Hahahaha... I made a similar tool once, but I actually used the bike tube instead of compressed air! I didn`t find out how much pressure is too much!
   We also used it for refilling a friend`s gearbox with oil, it was leaking a pint each week! I hope no bikers followed hin to work...

dkp_cobra

  • Hero Member
  • *****
  • Posts: 933
    • View Profile
'tool time' story: how I recreate my MK 4
« Reply #163 on: January 30, 2009, 08:38:38 »
quote:
Originally posted by nikbj68
   
Hahahaha... I made a similar tool once, but I actually used the bike tube instead of compressed air! I didn`t find out how much pressure is too much!
   We also used it for refilling a friend`s gearbox with oil, it was leaking a pint each week! I hope no bikers followed hin to work...


   My first attempt was also with the bike tube but with a quite good bike tube. Definitely too much pressure [:(!]

dkp_cobra

  • Hero Member
  • *****
  • Posts: 933
    • View Profile
'tool time' story: how I recreate my MK 4
« Reply #164 on: February 21, 2009, 16:58:23 »
I start working on the wiring loom. First the front part. Measuring at the car:


   removing it from the car:


   covered with heat shrink tube:
   
« Last Edit: April 18, 2018, 10:21:20 by dkp_cobra »